This page may contain spoilers related to the background-story of ARK: Survival Evolved. If you want to experience the story ingame, you probably shouldn't continue reading on this page.
On The Island the Dragon can only be found in the Dragon Arena. To reach this location, players must go to either a Supply Crate or Obelisk and place the required tribute items inside, then click on the Generate Dragon Portal item. A portal will be opened to teleport nearby players and dinos into the arena. If playing in Single Player mode, the portal can only be generated from the Red Obelisk.
In Survival of the Fittest, the Dragon will appear on the central platform about halfway through the match and will be available for taming. The Dragon will only be rideable for a short time before it will turn on its master.[1]
Finally you can summon it in Fjordur via the Terminal located in Dvergheim cave.
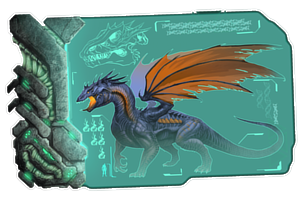
The Dragon is massive, easily dwarfing both the Broodmother and Megapithecus in size, it stands and walks in a bipedal stance. However it will become quadrupedal when sprinting. It is purple in color with orange wings and some orange patterning running along the side of the body with the two most notable being large orange strips running with the first running from the back of its head to the base of its neck and the second running along the sides of the body. Its head has a crown of horns.
Its appearance on Beta is a brownish body with orange shades around the feet and arms and its Alpha appearance is a very deep red coloration with the coloration becoming brighter around the feet and arms
Color Scheme and Regions
The Dragon used to spawn with an extremely diverse range of colorization, however this was changed during the development of the Dragon's Boss Arena.
The Dragon always spawns with the same color scheme and has no color regions.
This means it is currently impossible to make alterations to the Dragon's colors.
Colors
The Dragon has different colors depending on its difficulty level:
Difficulty Level
Color
Gamma
Default Coloring
Beta
Yellow
Alpha
Red
Tribute Requirements
The following items are needed to summon the Dragon:
Note that the values are for optimal cases, always bring extra supplies!
For a level-dependent count of resources needed, try an external taming calculator.
This section describes how to fight against the Dragon.
General
Please keep in mind that the Dragon is considered by many players to be the third toughest boss to defeat (preceded by the Corrupted Master Controller and King Titan)
The Dragon is the strongest of the three The Island Guardians and should be saved for last due to how tough it is. On top of that, taking down the Megapithecus and Broodmother will help give the players an advantage due to having new, better equipment to take on the Dragon with.
Strategy
The Dragon is far stronger than the two previous Guardians on The Island, thanks to the ability to do percent-based fire breath damage. This fire will drain 20% of anything's max health as well as do some direct impact damage, so brute-forcing with your dino armies won't work out quite as well as in the Megapithecus and Broodmother fights. Therefore, a strategy that utilizes more than brute strength is important in taking it down.
You'll need to pay attention to the Dragon's fireballs and minions, as well as make sure you bring Mastercraft or Ascendant quality firearms that do good damage. Primitive weapons are a waste of time and will do little damage. As for the previously mentioned attacks, the fireballs do a fair amount of damage (less to herbivores) and have a large explosion radius, as well as having the ability to directly damage riders.
The minions that the Dragon summons are hostile Pteranodon and Dimorphodon. The Dimorphodons are also capable of directly damaging mounted survivors, so bringing extra backup sets of armor and several Medical Brews is highly advised.
The Dragon uses its Fire Breath attack on a cooldown, and will immediately attempt it when it is in range of any tames. Because of this, the Dragon will always use its Fire Breath attack first after it lands on the ground following its minion phase. A good method to mitigating damage from this attack is to approach it with only one dinosaur after it lands to soak the attack rather than sending in an army of tames. This will significantly reduce the spread of damage across your army and make for a much easier fight.
Recommended Tames
An army of Therizinosaurus are generally considered the safest option, primarily due to being able to heal from Sweet Vegetable Cakes, while also having comparable DPS to carnivorous counterparts such as the Rex, due to posessing damage nearly as high and negligable differences in attack speed. In the Dragon fight specifically, the damage difference is evened more by the requirement of sacrificing a damage tame for healing for non-carnivorous options. Since the most dangerous aspect of the Dragon is the percentage effect, the almost unique ability to counter it makes them particularly valuage. While the damage of the fireball is negligible compared to the percentage drain of the fire breath, the reduced damage taken from that attack also contributes to the overall endurance. This only applies to the fireball since the percentage based damage is not affected by the Therizino being a herbivore, hence the damage reduction being the most minor factor in their suitability. To utilize Veggie Cakes most efficiently, 21k health points is the highest useful amount- since each cake regenerates 10% of the creature's maximum health, but caps at 2100 total points. They will automatically eat cakes placed in their inventories, resulting in passive healing of 0.33% Max Health per second, over a 30 second period. This results in 2 Veggie Cakes being required to negate one Fire Breath, so Therizinos can negate one Fire Breath per minute.
A Yutyrannus can still prove useful, as long as it's mounted to ensure the Dragon remains at a safe distance. As with other boss fights, it is valuable to act as support, buffing the damage dealing tames (thanks to its Courage Roar providing an additional 20% resistance and 25% damage).
A Daeodon can be useful due to their passive healing ability.
The classic Rex rush strategy can also work against the Gamma and Beta Dragon, despite typically being less favoured than the Therizinosaurus. The Alpha Dragon can also be taken down but casualties are likely to be taken. In order to improve the survivability against the Alpha Dragon, the Daeodon healing ability should be used, which will allow the Rexes to tank 6 or even 7 Fire Breaths. The Daeodon requires a rider force feeding it with Basic Kibble in order to maximize its healing efficiency. Without a form of healing, the fight is effectively reduced to the time taken for the Dragon to use 5 fire breaths. As is usual for rush strategies, a Yutyrannus' assistance should also be used. Despite being called a "rush" strategy, player skill and awareness do matter against the Alpha Dragon. Attacks should not be initiated near a lava pool and it is important to spread the forces correctly around the Dragon in order the reduce the number of Rexes hit by the Fire Breath at once. Additionally, they are able to step over the arena's lava rivers without taking damage, reducing the risk of environmental damage.
A very tanky Megaloceros can be used to kite the Dragon, holding its attention to allow tribemates to open fire on it without fear.
Magmasaurs can be used as a taunting tank towards the Dragon and its cohort of flying creatures, keeping the damage dealing tames safer. Moreover, they are immune to the blast damage caused by the Dragon's fire breath and nearby lava within the arena, and supplied with Metal Ingot, can fire Searing Spit while its still in air. Its size makes it inconvenient to bring into the arena, but it can be worthwhile due to its effectiveness at keeping tames in the arena safe. Its saddle also makes the rider impervious to Dimorphodon's attack, reducing the chances of the fight being ended by direct rider damage.
If you are planning on defeating the Dragon with several other people, using high damage ridden Woolly Rhinos with good saddles and vegetable cake can make for an easy victory. It is possible to charge underneath the Dragon's feet indefinitely like a sort of treadmill, with the help of other rhino riders by colliding with each other and the dragon's feet. If done correctly, damage can be stacked quickly while avoiding the fire breath attack.
The Deinonychus' bleeding damage uniquely affects the Dragon, allowing it to inflict enormous amounts of damage. A high level one can therefore kill even the Alpha Dragon by attacking its back-left foot. This makes the Dragon unable to attack while the bleeding effect does enough damage to take it out. However, it can still fly away, so be prepared for dealing with army of Dimorphodons and Pteranodons it will summon.
Bleed damage from a Deinonychus can on average deal about 7,000 damage per tick.
Despite having no saddle and a low health pool, a pack of Direwolves can shred even Alpha Dragon if a creature with a high health pool and high drag weight can distract it for long enough.
Dangers
The firebreath tears through health and no resistance or armor will reduce it, so be careful when facing it.
The fireballs it shoots are AoE, dealing a lot of damage to not only the tame but the rider as well, so be very careful.
The Dimorphs that spawn in the arena will kill you, even on your mount.
Try to avoid the lava streams while fighting it as the Dragon is immune to them, only causing them to be hazards for your own tames.
Its breath attacks deal more damage to carnivores so normal tactics such as Rex Rushing - while possible - aren't advised as it's very risky.
The arena itself is very hot, so putting points into fortitude and bringing some Calien Soup and Ghillie armor to protect yourself is advised.
Due to the Dragons' Fireball attack and Dimorphs damaging riders, the player will definitely need high level Ghillie armor to help withstand the damage.
The Dragon can instakill a player with its bite attack, so be sure to remain mounted as much as possible, especially if playing single player.
Within the Ragnarok Arena there will also be the Manticore to watch out for along with both its Rock Elemental and Griffin Minions.
In the Forsaken Oasis you will have to watch out for both the Megapithecus and Manticore when you face the Dragon.
Weakness
While the biggest of all the Island bosses, its backside has the largest hitbox. The Dragon can get stuck on the ruins around the arena, allowing shots to be taken afar (but do not rely on this lasting for the entire fight, as it will eventually fly away).
Sometimes the Dragon will only go to the player, giving your army a chance to safely damage to it.
If players spread their creatures around and completely surround and pin the Dragon, it would be distracted and focus its fire attack on one side, helping your unaffected creatures live a little longer during the fight.
In the story, Gaius Marcellus Nerva and his tribe, the New Legion, managed to kill the Dragon. He refers to it as a Dragon belonging to the Roman goddess Ceres, then corrects himself, stating it was too colossal and wild for even a god's chariot.
He notes that the combined strength of the Dragon, Mei Yin's tames, and Mei Yin's Giganotosaurus were enough to weaken the New Legion to a point where lesser tribes began to take over the territory they had conquered.
The Pterosaurs and Dimorphodons in the boss battle appear to have taken on a role similar to Vultures scavenging off the corpses of the Dragons enemies as the Dragon is the largest terrestrial carnivore on The Island and both creatures are usually neutral to the player in the wild to the point of even being skittish likely changing their natural behavior due to the Dragon wiping out surrounding creatures.
When facing the Dragon, herbivorous creatures have a resistance to its devastating fire breath. In lore, Helena noted of how the herbivorous creatures that Mei Yin had and in general thick hides that can help them to resist explosions and fire. However, in game, only the FireBall's damage is reduced by herbivore fire resistance.
Notes/Trivia
For information pertaining specifically to the real-world Dragon, see the relevant Wikipedia article.
If one uses the summon command to spawn a large amount of Dragons and kills them all instantly with the creative mode rifle, the corpses will stretch and get flung all over the place, making it hard to see. This also happens with the Ankylosaurus.
The Dragon is the 1st boss to specifically be based on a real mythological creature, the 2nd being the Manticore and the 3rd being the Crystal Wyvern Queen.
Interestingly all 3 can fly.
Admin-spawned Dragons despawn 20 minutes after taming.
Its purple and orange color scheme may be a reference to the Spyro franchise.
In the Creature's dossier it looks bigger than the Titanosaur, though this is inaccurate. This can be explained by the fact that the Dragon boss in early access was about 15% bigger than now. Moreover, the initial Dragon in the first EA trailer was about 1.5 times bigger than the Titanosaur. Since mid-2016, the Dragon in-game is still slightly larger than the Bronto and about 20% smaller than the Titanosaur.
If tamed or spawned through the use of Console Commands, the Dragon will be unable to move, use some of its attacks, be ridden or respect player's whistles due to its AI being dependent on the presence of the arena.
In SotF, the Dragon is permanently passive, and will not attack anything unless ridden.
The Dragon cannot swim, but can walk or even fly in water.
You can not use any kind of Tek Gear inside the Arena.
The Dragon is the only Guardian in Genesis: Part 1 that got an X variant, and the only Guardian that doesn't appear in Gauntlet.
In Ragnarok Arena, the Dragon takes 3x damage, having an effective health one third of normal. This is perhaps to balance the difficulty of bosses in Ragnarok, as fighting 2 bosses both at their original stats on default server settings could be extremely difficult.
Possibly a bug: Dragons summoned underwater can be tamed passively by putting meat in their inventory and will fully function as a mount. However they only last a few minutes and cannot harvest nor obey whistles.
Dragon's Dermis could transfer in different server and function normally, but not Ragnarok/Valguero variants.
There is a code "Volcanic_Dragon_Character_BP_C" which spawns a Dragon, that glows red and orange in darkness.


 Yes
Yes


 Behemoth Tek Gate
 Behemoth Tek Gateway
 Cloning Chamber
 Megalodon Tek Saddle
 Tapejara Tek Saddle
 Tek Chestpiece
 Tek Dedicated Storage
 Tek Double Door
 Tek Double Doorframe
 Tek Fence Support
 Tek Forcefield
 Tek Leggings
 Tek Replicator
 Tek Stairs
 Tek Teleporter
 Tek Transmitter
 Vacuum Compartment
 Vacuum Compartment Moonpool
 Small Tek Teleporter
 Therizinosaurus are generally considered the safest option, primarily due to being able to heal from
  Sweet Vegetable Cakes, while also having comparable DPS to carnivorous counterparts such as the
  Rex, due to posessing damage nearly as high and negligable differences in attack speed. In the Dragon fight specifically, the damage difference is evened more by the requirement of sacrificing a damage tame for healing for non-carnivorous options. Since the most dangerous aspect of the Dragon is the percentage effect, the almost unique ability to counter it makes them particularly valuage. While the damage of the fireball is negligible compared to the percentage drain of the fire breath, the reduced damage taken from that attack also contributes to the overall endurance. This only applies to the fireball since the percentage based damage is not affected by the Therizino being a herbivore, hence the damage reduction being the most minor factor in their suitability.
 Yutyrannus can still prove useful, as long as it's mounted to ensure the Dragon remains at a safe distance. As with other boss fights, it is valuable to act as support, buffing the damage dealing tames (thanks to its Courage Roar providing an additional 20% resistance and 25% damage).
 Daeodon can be useful due to their passive healing ability.
 Basic Kibble in order to maximize its healing efficiency. Without a form of healing, the fight is effectively reduced to the time taken for the Dragon to use 5 fire breaths. As is usual for rush strategies, a
  Megaloceros can be used to kite the Dragon, holding its attention to allow tribemates to open fire on it without fear.
 Magmasaurs can be used as a taunting tank towards the Dragon and its cohort of flying creatures, keeping the damage dealing tames safer. Moreover, they are immune to the blast damage caused by the Dragon's fire breath and nearby lava within the arena, and supplied with
  Metal Ingot, can fire Searing Spit while its still in air. Its size makes it inconvenient to bring into the arena, but it can be worthwhile due to its effectiveness at keeping tames in the arena safe. Its saddle also makes the rider impervious to
  Dimorphodon's attack, reducing the chances of the fight being ended by direct rider damage.
 Deinonychus' bleeding damage uniquely affects the Dragon, allowing it to inflict enormous amounts of damage. A high level one can therefore kill even the Alpha Dragon by attacking its back-left foot. This makes the Dragon unable to attack while the bleeding effect does enough damage to take it out. However, it can still fly away, so be prepared for dealing with army of
  Pteranodons it will summon.
 King Titan, second being
  Rockwell, the third being
  Moeder followed by the
  Alpha Deathworm/
 Ice Titan as 5th,
  Forest Titan as 6th,
  Desert Titan as 7th, the
  Titanosaur being 8th, the
  Astrocetus at 9th and finally the
  Alpha Tusoteuthis as 10th largest), its even larger than most of the large creatures such as
  Brontosaurus,
  DodoRex or
  Giganotosaurus and it ties with the
  Alpha Mosasaurus for 11th place.
 Manticore and the 3rd being the
  Crystal Wyvern Queen.


2 Can be ridden in Survival of the Fittest for 15 minutes before it despawns.