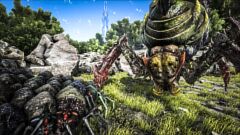
The Broodmother Arena, accesible via the Obelisks and Supply Crates on The Island.
Broodmother Lysrix
(Redirected from Broodmother Lysrix (Beta))
Jump to navigation
Jump to search
This page may contain spoilers related to the background-story of ARK: Survival Evolved.
If you want to experience the story ingame, you probably shouldn't continue reading on this page.
Broodmother Lysrix

Spawn Command
or
or
or
or
or
or
or
or
or
or
or
or
cheat summon SpiderL_Character_BP_Cor
cheat SpawnDino "Blueprint'/Game/PrimalEarth/Dinos/Spider-Large/SpiderL_Character_BP.SpiderL_Character_BP'" 500 0 0 35Variant Broodmother Lysrix (Gamma)
cheat summon SpiderL_Character_BP_Easy_Cor
cheat SpawnDino "Blueprint'/Game/PrimalEarth/Dinos/Spider-Large/SpiderL_Character_BP_Easy.SpiderL_Character_BP_Easy'" 500 0 0 35Variant Broodmother Lysrix (Beta)
cheat summon SpiderL_Character_BP_Medium_Cor
cheat SpawnDino "Blueprint'/Game/PrimalEarth/Dinos/Spider-Large/SpiderL_Character_BP_Medium.SpiderL_Character_BP_Medium'" 500 0 0 35Variant Broodmother Lysrix (Alpha)
cheat summon SpiderL_Character_BP_Hard_Cor
cheat SpawnDino "Blueprint'/Game/PrimalEarth/Dinos/Spider-Large/SpiderL_Character_BP_Hard.SpiderL_Character_BP_Hard'" 500 0 0 35Variant Broodmother Lysrix (Gamma) (The Center)
cheat summon SpiderL_Character_BP_TheCenter_Cor
cheat SpawnDino "Blueprint'/Game/PrimalEarth/Dinos/Spider-Large/SpiderL_Character_BP_TheCenter.SpiderL_Character_BP_TheCenter'" 500 0 0 35Variant Broodmother Lysrix (Beta) (The Center)
cheat summon SpiderL_Character_BP_TheCenterMedium_Cor
cheat SpawnDino "Blueprint'/Game/PrimalEarth/Dinos/Spider-Large/SpiderL_Character_BP_TheCenterMedium.SpiderL_Character_BP_TheCenterMedium'" 500 0 0 35Variant Broodmother Lysrix (Alpha) (The Center)
cheat summon SpiderL_Character_BP_TheCenterHard_Cor
cheat SpawnDino "Blueprint'/Game/PrimalEarth/Dinos/Spider-Large/SpiderL_Character_BP_TheCenterHard.SpiderL_Character_BP_TheCenterHard'" 500 0 0 35Variant Broodmother Lysrix (Valguero)
cheat summon SpiderL_VAL_Character_BP_Cor
cheat SpawnDino "Blueprint'/Game/Mods/Valguero/Assets/Dinos/SpiderL/SpiderL_VAL_Character_BP.SpiderL_VAL_Character_BP'" 500 0 0 35Variant Broodmother Lysrix (Gauntlet)
cheat summon SpiderL_Character_BP_Gauntlet_Cor
cheat SpawnDino "Blueprint'/Game/Genesis/Dinos/MissionVariants/Gauntlet/Bog/SpiderL_Character_BP_Gauntlet.SpiderL_Character_BP_Gauntlet'" 500 0 0 35Variant Broodmother Lysrix (Gamma) (Fjordur)
cheat summon SpiderL_Character_BP_Easy_FJ_Cor
cheat SpawnDino "Blueprint'/Game/Fjordur/Dinos/IslandBosses/SpiderL_Character_BP_Easy_FJ.SpiderL_Character_BP_Easy_FJ'" 500 0 0 35Variant Broodmother Lysrix (Beta) (Fjordur)
cheat summon SpiderL_Character_BP_Medium_FJ_Cor
cheat SpawnDino "Blueprint'/Game/Fjordur/Dinos/IslandBosses/SpiderL_Character_BP_Medium_FJ.SpiderL_Character_BP_Medium_FJ'" 500 0 0 35Variant Broodmother Lysrix (Alpha) (Fjordur)
cheat summon SpiderL_Character_BP_Hard_FJ_Cor
cheat SpawnDino "Blueprint'/Game/Fjordur/Dinos/IslandBosses/SpiderL_Character_BP_Hard_FJ.SpiderL_Character_BP_Hard_FJ'" 500 0 0 35Habitat
The Center Arena, accesible via the Obelisks and Supply Crates on The Center.


Common Rare
Untameable Cave
Untameable Cave
Broodmother Lysrix is one of the game bosses. It can only be reached by generating a portal to it at a Supply Crate or Obelisk on The Island and The Center. It can also be found in the wild in The Lair on Valguero.
A weaker variant of Broodmother Lysrix spawns at the last wave in the Gauntlet Mission Bog Beatdown in Genesis. Moreover, the Broodmother can be tamed and ridden for a short time from the Green Mini Obelisk in the Survive the ARK mission on Genesis: Part 2.
It was first added in ![]() ARK: Survival Evolved on its early release.
ARK: Survival Evolved on its early release.
Basic Info
Appearance
The Broodmother Lysrix is a giant spider with two viciously large fangs seemingly dripping with venom and large spikes protruding from the abdomen.
Colors of the Broodmother vary depending on the difficulty level with the Beta being a Yellow color and Alpha being a Red color
Color Scheme and Regions
The Broodmother Lysrix always spawns with the same color scheme and has no color regions.
This means it is currently impossible to make alterations to the Broodmother Lysrix's colors.
Colors
The Broodmother has different types of color due to its difficulty level
| Broodmother Difficulty | Broodmother Color |
|---|---|
| Gamma (Easy) | Default Coloring |
| Beta (Medium) | Yellow |
| Alpha (Hard) | Red |
Background

It is suggested in the Araneo dossier that the Broodmother is the queen and parent of the island's spiders.
Location
The Broodmother can be found in the Broodmother Arena and the The Center Arena. To reach this location, players must go to either a Supply Crate or Obelisk and place the required tribute items inside, then click on the ![]() Generate Broodmother Portal or the Center Portal item. At this point a portal will be opened to teleport nearby players and dinos into the arena, open for approximately 25 seconds. (Up to 10 survivors and 20 tames only.)
Generate Broodmother Portal or the Center Portal item. At this point a portal will be opened to teleport nearby players and dinos into the arena, open for approximately 25 seconds. (Up to 10 survivors and 20 tames only.)
Alternatively she can be found in the redwoods on Valguero.
If playing on The Island in Single Player mode, the portal can only be generated from the Green Obelisk.
On Fjordur, Broodmother Lystrix must be summoned at a specific terminal within The Overgrown Grave (Fjordur), to which the entrance is located at 57.5/65.8.
Tribute Requirements
The following items are needed to open the Broodmother Portal:
| Item Required | Gamma | Beta | Alpha |
|---|---|---|---|
| Player Level | 30 | 50 | 70 |
| 1 | 1 | 1 | |
| 1 | 1 | 1 | |
| 1 | 1 | 1 | |
| - | 5 | 10 | |
| - | 5 | 10 | |
| - | 5 | 10 | |
| - | 5 | 10 |
| Item Required | Gamma | Beta | Alpha |
|---|---|---|---|
| Player Level | 30 | 50 | 70 |
| 1 | 1 | 1 | |
| 1 | 1 | 1 | |
| 1 | 1 | 1 | |
| 1 | 1 | 1 | |
| - | 5 | 10 | |
| - | 5 | 10 | |
| - | 5 | 10 | |
| - | 5 | 10 |
Tribute Spawn Commands
Use these commands to give yourself all the items needed for tribute:
| Gamma |
cheat giveitem "Blueprint'/Game/PrimalEarth/CoreBlueprints/Items/Artifacts/PrimalItemArtifact_05.PrimalItemArtifact_05'" 1 0 0 | cheat giveitem "Blueprint'/Game/PrimalEarth/CoreBlueprints/Items/Artifacts/PrimalItemArtifact_01.PrimalItemArtifact_01'" 1 0 0 | cheat giveitem "Blueprint'/Game/PrimalEarth/CoreBlueprints/Items/Artifacts/PrimalItemArtifact_03.PrimalItemArtifact_03'" 1 0 0
|
| Beta |
cheat giveitem "Blueprint'/Game/PrimalEarth/CoreBlueprints/Resources/PrimalItemResource_ApexDrop_Argentavis.PrimalItemResource_ApexDrop_Argentavis'" 5 0 0 | cheat giveitem "Blueprint'/Game/PrimalEarth/CoreBlueprints/Items/Artifacts/PrimalItemArtifact_05.PrimalItemArtifact_05'" 1 0 0 | cheat giveitem "Blueprint'/Game/PrimalEarth/CoreBlueprints/Items/Artifacts/PrimalItemArtifact_01.PrimalItemArtifact_01'" 1 0 0 | cheat giveitem "Blueprint'/Game/PrimalEarth/CoreBlueprints/Items/Artifacts/PrimalItemArtifact_03.PrimalItemArtifact_03'" 1 0 0 | cheat giveitem "Blueprint'/Game/PrimalEarth/CoreBlueprints/Resources/PrimalItemResource_ApexDrop_Sarco.PrimalItemResource_ApexDrop_Sarco'" 5 0 0 | cheat giveitem "Blueprint'/Game/PrimalEarth/CoreBlueprints/Resources/PrimalItemResource_ApexDrop_Sauro.PrimalItemResource_ApexDrop_Sauro'" 5 0 0 | cheat giveitem "Blueprint'/Game/PrimalEarth/CoreBlueprints/Resources/PrimalItemResource_ApexDrop_Boa.PrimalItemResource_ApexDrop_Boa'" 5 0 0
|
| Alpha |
cheat giveitem "Blueprint'/Game/PrimalEarth/CoreBlueprints/Resources/PrimalItemResource_ApexDrop_Argentavis.PrimalItemResource_ApexDrop_Argentavis'" 10 0 0 | cheat giveitem "Blueprint'/Game/PrimalEarth/CoreBlueprints/Items/Artifacts/PrimalItemArtifact_05.PrimalItemArtifact_05'" 1 0 0 | cheat giveitem "Blueprint'/Game/PrimalEarth/CoreBlueprints/Items/Artifacts/PrimalItemArtifact_01.PrimalItemArtifact_01'" 1 0 0 | cheat giveitem "Blueprint'/Game/PrimalEarth/CoreBlueprints/Items/Artifacts/PrimalItemArtifact_03.PrimalItemArtifact_03'" 1 0 0 | cheat giveitem "Blueprint'/Game/PrimalEarth/CoreBlueprints/Resources/PrimalItemResource_ApexDrop_Sarco.PrimalItemResource_ApexDrop_Sarco'" 10 0 0 | cheat giveitem "Blueprint'/Game/PrimalEarth/CoreBlueprints/Resources/PrimalItemResource_ApexDrop_Sauro.PrimalItemResource_ApexDrop_Sauro'" 10 0 0 | cheat giveitem "Blueprint'/Game/PrimalEarth/CoreBlueprints/Resources/PrimalItemResource_ApexDrop_Boa.PrimalItemResource_ApexDrop_Boa'" 10 0 0
|
| Fjordur Relic |
|---|
cheat giveitem "Blueprint'/Game/Mods/FjordurOfficial/Assets/CoreBlueprints/Items/PrimalItemResource_MiniBossDrop_Beyla.PrimalItemResource_MiniBossDrop_Beyla'" 1 0 0
|
Drops
- Harvests
- Guaranteed Special Loot
- Inventory
| Item | Difficulty | ||
|---|---|---|---|
| Gamma | Beta | Alpha | |
| 20 | 56 | 148 | |
Unlocks
 Mosasaur Tek Saddle
 Sloped Tek Roof
 Sloped Tek Wall Left
 Sloped Tek Wall Right
 Tek Boots
 Tek Catwalk
 Tek Ceiling
 Tek Fence Foundation
 Tek Foundation
 Tek Helmet
 Tek Ladder
 Tek Pillar
 Tek Railing
 Tek Ramp
 Tek Replicator
 Tek Staircase
 Tek Triangle Ceiling
 Tek Triangle Foundation
 Tek Triangle Roof
 Tek Turret
 Tek Wall
Completing the harder difficulties will unlock all of the lower difficulty Tekgrams as well.
On Valguero, the wild spawning Broodmothers do not give the Tekgrams, but instead assorted Blueprint when killed.
Achievements:
 |
Veteran Survivor You defeated ARK's first Ultimate Life Form! |
 |
Survivor of the Center You defeated the guardians of The Center! |
Base Stats and Growth
| Attribute | Base Value | Level Increase |
|---|---|---|
| Wild | ||
| 324000 | +64800 | |
| 150 | +15 | |
| N/A | N/A | |
| 1500 | +150 | |
| 4000 | +80 | |
| 180 / 260 | +9 / +13 | |
| 100% | N/A | |
| 100000 | +6000 |
- For a comparison of the stats of all creatures, see Base Creature Statistics.
- For an explanation of exactly how the levelup calculation works, see Creature Stats Calculation.
- 1These are the base speeds of the tamed creature at 100% Movement Speed, i.e. without a possible taming bonus.
- 2These are the speeds of the creature once tamed including a possible taming bonus and no imprinting bonus.
- For a comparison of the speeds of all creatures, see Base Creature Speeds.
| Attribute | Base Value | Level Increase |
|---|---|---|
| Wild | ||
| 648000 | +97200 | |
| 150 | +15 | |
| N/A | N/A | |
| 1500 | +150 | |
| 4000 | +80 | |
| 320 / 520 | +11.2 / +18.2 | |
| 100% | N/A | |
| 100000 | +6000 |
- For a comparison of the stats of all creatures, see Base Creature Statistics.
- For an explanation of exactly how the levelup calculation works, see Creature Stats Calculation.
- 1These are the base speeds of the tamed creature at 100% Movement Speed, i.e. without a possible taming bonus.
- 2These are the speeds of the creature once tamed including a possible taming bonus and no imprinting bonus.
- For a comparison of the speeds of all creatures, see Base Creature Speeds.
| Attribute | Base Value | Level Increase |
|---|---|---|
| Wild | ||
| 972000 | +243000 | |
| 150 | +15 | |
| N/A | N/A | |
| 1500 | +150 | |
| 4000 | +80 | |
| 540 / 780 | +40.5 / +58.5 | |
| 100% | N/A | |
| 100000 | +6000 |
- For a comparison of the stats of all creatures, see Base Creature Statistics.
- For an explanation of exactly how the levelup calculation works, see Creature Stats Calculation.
- 1These are the base speeds of the tamed creature at 100% Movement Speed, i.e. without a possible taming bonus.
- 2These are the speeds of the creature once tamed including a possible taming bonus and no imprinting bonus.
- For a comparison of the speeds of all creatures, see Base Creature Speeds.
| Attribute | Base Value | Level Increase |
|---|---|---|
| Wild | ||
| 356400 | +71280 | |
| 150 | +15 | |
| N/A | N/A | |
| 1500 | +150 | |
| 4000 | +80 | |
| 210 / 300 | +10.5 / +15 | |
| 100% | N/A | |
| 100000 | +6000 |
- For a comparison of the stats of all creatures, see Base Creature Statistics.
- For an explanation of exactly how the levelup calculation works, see Creature Stats Calculation.
- 1These are the base speeds of the tamed creature at 100% Movement Speed, i.e. without a possible taming bonus.
- 2These are the speeds of the creature once tamed including a possible taming bonus and no imprinting bonus.
- For a comparison of the speeds of all creatures, see Base Creature Speeds.
| Attribute | Base Value | Level Increase |
|---|---|---|
| Wild | ||
| 421200 | +84240 | |
| 150 | +15 | |
| N/A | N/A | |
| 1500 | +150 | |
| 4000 | +80 | |
| 280 / 400 | +14 / +20 | |
| 100% | N/A | |
| 100000 | +6000 |
- For a comparison of the stats of all creatures, see Base Creature Statistics.
- For an explanation of exactly how the levelup calculation works, see Creature Stats Calculation.
- 1These are the base speeds of the tamed creature at 100% Movement Speed, i.e. without a possible taming bonus.
- 2These are the speeds of the creature once tamed including a possible taming bonus and no imprinting bonus.
- For a comparison of the speeds of all creatures, see Base Creature Speeds.
| Attribute | Base Value | Level Increase |
|---|---|---|
| Wild | ||
| 486000 | +97200 | |
| 150 | +15 | |
| N/A | N/A | |
| 1500 | +150 | |
| 4000 | +80 | |
| 700 / 1000 | +35 / +50 | |
| 100% | N/A | |
| 100000 | +6000 |
- For a comparison of the stats of all creatures, see Base Creature Statistics.
- For an explanation of exactly how the levelup calculation works, see Creature Stats Calculation.
- 1These are the base speeds of the tamed creature at 100% Movement Speed, i.e. without a possible taming bonus.
- 2These are the speeds of the creature once tamed including a possible taming bonus and no imprinting bonus.
- For a comparison of the speeds of all creatures, see Base Creature Speeds.
| Attribute | Base Value | Level Increase |
|---|---|---|
| Wild | ||
| 324000 | +64800 | |
| 150 | +15 | |
| 150.0 | +2250 | |
| 1500 | +150 | |
| 4000 | +80 | |
| 400 / 500 | +20 / +25 | |
| 100% | N/A | |
| 100000 | +6000 |
- For a comparison of the stats of all creatures, see Base Creature Statistics.
- For an explanation of exactly how the levelup calculation works, see Creature Stats Calculation.
- 1These are the base speeds of the tamed creature at 100% Movement Speed, i.e. without a possible taming bonus.
- 2These are the speeds of the creature once tamed including a possible taming bonus and no imprinting bonus.
- For a comparison of the speeds of all creatures, see Base Creature Speeds.
Wild Stats Level-up
Type in values of a wild creature to see on which stats it's emphasized. Green values on a high-level creature are very good for breeding. If you have already tamed your creature you can try to recover the breeding stats with an external tool.[1]
Broodmother Lysrix (Gamma)
The stat-calculator does not work in the mobile-view, see here for alternatives: Apps
Note that after the creature is tamed it gets bonuses on some stats depending on the taming effectiveness. This makes it hard to retrieve the levels on a tamed creature, so this tool is only for wild ones, but gives a first impression, how well the stats are distributed.
Combat
This section describes how to fight against the Broodmother Lysrix.
General
The Broodmother is the intermediate of the Guardians on The Island being stronger than the ![]() Megapithecus but weaker than the
Megapithecus but weaker than the ![]() Dragon and while it does give you the least amount of rewards it's still best to fight the Broodmother after the Megapithecus and before the Dragon to help you better prepare for the Dragon fight. If you want to fight the Island bosses in lore order, start with the Broodmother first, with the Megapithecus second, and Dragon for last.
Dragon and while it does give you the least amount of rewards it's still best to fight the Broodmother after the Megapithecus and before the Dragon to help you better prepare for the Dragon fight. If you want to fight the Island bosses in lore order, start with the Broodmother first, with the Megapithecus second, and Dragon for last.
The Broodmother Lysrix is a dangerous enemy as It spawns ![]() Araneo as minions, slows players and mounts with its web attack, uses an acid projectile attack, and can cause torpor damage. However provided the right tames and equipment are brought to the battle, it can be defeated quite easily.
Araneo as minions, slows players and mounts with its web attack, uses an acid projectile attack, and can cause torpor damage. However provided the right tames and equipment are brought to the battle, it can be defeated quite easily.
Strategy
There isn't really much strategy needed to fight a Broodmother, most of the time, whistling all dinos to attack her will be sufficient enough. Make sure before you do this, everyone is saddled up and on board their dinos--once you've teleported in the arena, you'll be kicked off your mount, but you can instantly ride it again. Success in this boss fight is largely dependent on the tames and saddles you bring. While they most likely wouldn't be used, firearms should be brought in as a last resort just to be safe. Make sure to surround the Broodmother for maximum damage output.
Recommended Tames
- A
 Yutyrannus or two (preferably mate boosted) should always be brought into any arena, as their courage roar ability and generally good stats make them one of, if not the most valuable creatures for use in boss fights.
 - having File:Deinosuchus.png Deinosuchus are a great tactic for their strong stats and devastating Giga Bite attacks they can tear into Boss Health.
- The
 Megatherium is probably the best fighting mount for the Broodmother fight because of its Insect Killer buff.
- Note: While Megatherium does better for this boss, other dinos like
 Rexes and
  Therizinosaurus are more than capable to handle this boss as well, and since Rexes and Therizinosaurus handles other bosses better than Megatherium, it could be argued that breeding Megatherium for this one boss only is not worth it (but that's without taking into account that you can use your weapons while mounted on Megatherium, and that you could also use them for other purposes, like clearing insects caves, or for their great harvesting capabilities).
- Note: While Megatherium does better for this boss, other dinos like
- A couple of
 Spinosaurus could also be useful since there is water in the arena that they can get the hydrated buff from.
 - You can also use
 Shadowmanes for their mate boost roar, and their much smaller size allows you to fit more of them onto the platform.
- Note: Yutyrannus roar stacks with the male Shadowmane roar.
- Note:
- An army of Therizinosaurus is a good strategy against this boss due to their high DPS and ability to quickly regenerate their health points (as long as they have
 Sweet Vegetable Cakes in their inventory).
 - An army of Rexes is a good strategy against this boss due to their high health and damage.
- Bringing one Yutyrannus acting as support buffing the damage tames is always a good idea (thanks to its Courage Roar ability which provides an additional 20% resistance and 25% damages).
- If players are willing to put the effort into micro-managing their food the
 Daeodon can also be valuable due to their healing ability.
 - A herd of 6
 Stegosaurus with the best possible saddles a player has built from a blueprint makes them a very tanky mount. Use them to charge the Broodmother head-on as their hardened plate mode reduces the boss's spit attack by half and the saddle can further decrease the damage to where the stegosaurs are only receiving a fourth of the damage. With hardened plate mode, above a 25.0 primitive saddle, and a Yutyrannus roar, they will be receiving only 20% of damage from the Broodmother.
Dangers
- You can get caught off-guard if you're not on a dino, as the Broodmother has the ability to fire webs that slow anything down.
- Many of the Broodmother's and her minions' attacks, both melee and ranged, can induce large amounts of
 Torpor, quickly knocking out you or your allies if you're not riding a dino.
 - On Alpha difficulty, Broodmother receives a significant buff to health and damage, requiring very high armor saddles, imprinting, and the Yutyrannus's courage buff. Make sure you have a strong breeding line of whichever dino you're bringing to the battle.
- The Megapithecus and its minions are also present in the Center Arena.
- On Valguero, the Broodmother can spawn in varying levels.
Weaknesses
- There is quite a large variety of creatures you can use in this fight that can be effective.
- The Broodmother is quite slow at gamma and beta difficulties.
- Megatheriums insect rage can quickly kill a Broodmother with little difficulty.
- Using a Procoptodon you can jump onto a mushroom in the arena and shoot the Broodmother with firearms solo without taking any damage (unless you're fighting the alpha variant).
Video Walkthrough
Lore
- The Broodmother appears within the Explorer Notes when the Iron Brotherhood take it on with the Broodmother wiping out most of the tribe.
- Within the Araneo Dossier it reveals the connection between the Broodmother and Araneo as the Broodmother is the mother of the Araneo.
- Within the Araneo Dossier it also mentions that the Broodmother is the likely candidate to have dug the artifact caves.
Notes/Trivia
- The Broodmother was the first Boss released for Ark. It could be spawned from any obelisk into the over world and fought. This was changed with v239.0, when it was given its respective arena that players had to teleport to.
- With the release of Valguero, it made the Broodmother the first open-world, naturally occurring boss.
- In the The Lair (Valguero) cocoons with spiders looking similar to the Broodmother can be found.
- However, this creature does not provide tekgram when killed, instead leaving behind assorted Blueprint in its place.
- Until patch 183.0 the Broodmother was actually tameable. However, this was removed from the game and in current versions; the Broodmother is not tameable with regular methods.
- In Genesis: Part 2, this guardian can be summoned to assist the survivors in Survive the ARK (Genesis: Part 2).
- After killing the Broodmother the first time, many players like to re-summon her in order to farm
 Chitin from the
  Spider Minions she summons (this was more common and easier prior to v239.0).
 - Her original dossier was actually written in Daedric writing from The Elder Scrolls series. It translates to a text that appears to be written in Latin, but in fact turns out to be the so-called "Lorem Ipsum", a common filler text used for publishing and graphics design.
- Interestingly enough, there is a small amount of text in the bottom left of the Guardian Hologram that reads "L Livingstone (C) BIOOIDIAC". The meaning of this is unknown, but there is a location named Livingstone Park in Extinction.
- If forcetamed, the Broodmother can be ridden. The Broodmother has three attacks that can be used: the regular melee attack, webbing multi-shot, and toxic multi-shot.
- The Broodmother Lysrix rewards the player with less
 Element than the Megapithecus.
 - In the story, Helena mentions a tribe known as "The Iron Brotherhood" killed the Broodmother. It seems it was a hard-fought battle, since the Iron Brotherhood's leader lamented over the tribemates lost in the fight.
- The Broodmother always spawns at level 1 in singleplayer.
- Information about Boss difficulty in relation to game mode : https://old.reddit.com/r/playark/comments/b3xlxz/boss difficulty with with varying max wild dino/
Changelog
| Patch | |
|---|---|
| 173.0 | Killing the Broodmother Lysrix will now update the dossier and Steam achievement correctly. |
| 184.0 | You can no longer pick up the Broodmother with flyers. |
| 213.1 | Can now summon Broodmother with tribute again. |
| 254.5 | Improved attack hit detection. |
| 254.5 | Improved attack hit detection. |
| 257.0 | New creature sounds for the Broodmother. |
| 258.6 | Rebalanced the Broodmother Lysrix. |
| 261.0 | Reduced the number of |
| 264.0 | Final boss balance for Broodmother boss in singleplayer. |
Spotlight
Gallery
Official promo image for the Survival of the Fittest
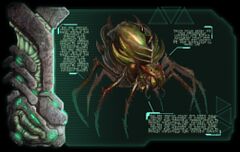
Original Dossier
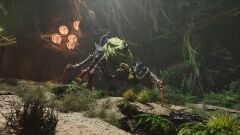
The Broodmother Lystrix in ARK: Survival Ascended


References
Categories:
- Spoiler
- Requires dv value verification
- Bosses
- Fantasy creatures
- Invertebrates
- Carnivores
- Aggressive creatures
- Creatures released in v1
- Creatures released in 2015
- Creatures released in v729
- Creatures released in v501
- Creatures released in 2016
- Creatures released in v521
- Creatures released in 2018
- Unavailable on Mobile
- Untameable creatures
- Unbreedable creatures
- Creatures that are immune to torpor
- Creatures that don't drop feces
- Creatures
- Pages with broken file links