

cheat summon Bee_Character_BP_Ccheat SpawnDino "Blueprint'/Game/PrimalEarth/Dinos/Bee/Bee_Character_BP.Bee_Character_BP'" 500 0 0 35Variant Giant Queen Bee
cheat summon Bee_Queen_Character_BP_Ccheat SpawnDino "Blueprint'/Game/PrimalEarth/Dinos/Bee/Bee_Queen_Character_BP.Bee_Queen_Character_BP'" 500 0 0 35Variant Giant Queen Bee (Gauntlet)
cheat summon Bee_Queen_Character_BP_Gauntlet_Ccheat SpawnDino "Blueprint'/Game/Genesis/Dinos/MissionVariants/Gauntlet/Bog/Bee_Queen_Character_BP_Gauntlet.Bee_Queen_Character_BP_Gauntlet'" 500 0 0 35Variant Giant Worker Bee
cheat summon HoneyBee_Character_BP_Ccheat SpawnDino "Blueprint'/Game/Mods/CrystalIsles/Assets/Dinos/HoneyBee/HoneyBee_Character_BP.HoneyBee_Character_BP'" 500 0 0 35Variant Giant Bee (Gauntlet2)
cheat summon Bee_Character_BP_STA_Ccheat SpawnDino "Blueprint'/Game/Genesis2/Missions/ModularMission/Gauntlet2/STA/Dinos/Bee_Character_BP_STA.Bee_Character_BP_STA'" 500 0 0 35Variant Giant Queen Bee (Gauntlet2)
cheat summon Bee_Queen_Character_BP_STA_Ccheat SpawnDino "Blueprint'/Game/Genesis2/Missions/ModularMission/Gauntlet2/STA/Dinos/Bee_Queen_Character_BP_STA.Bee_Queen_Character_BP_STA'" 500 0 0 35
The Giant Bee (jai-ahnt-bee) is one of the creatures in ARK: Survival Evolved.
This section is intended to be an exact copy of what the survivor Helena Walker, the author of the dossiers, has written. There may be some discrepancies between this text and the in-game creature.

Apis lithohermaea
TimeMiddle Miocene
DietHerbivore
TemperamentTerritorial
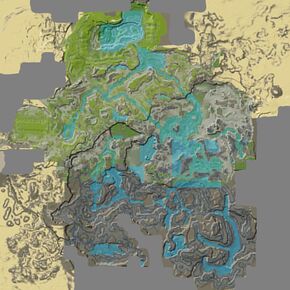
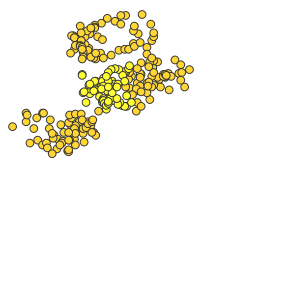
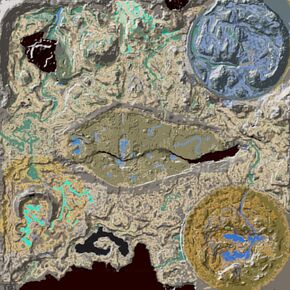
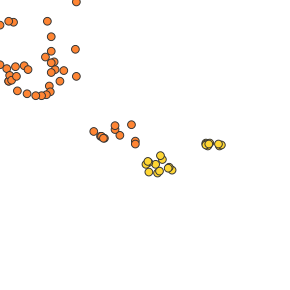
In the wild, Apis lithohermaea Drones never stray far from their nests, which they build high in the Island’s Redwood trees or on rocky cliffsides. Apis Drones can be seen swarming around the nest in groups, but to get a look at the Queen Apis, one would need to crack open the nest itself. Speaking from experience, this is not a pleasant task, as the untameable Apis Drones are quite territorial. I probably should have seen that one coming, in hindsight. Take caution: Apis stings will significantly weaken any creature which suffers them, and because its stinger is not barbed, Apis can sting multiple times without its stinger being ripped away.
A tamed Apis Queen will lay new drone eggs, and construct a nest that survivors can farm for honey, so long as they remember to wear specialized bee-keeping gear. Said honey is not only sweet and delicious, but laced with scents that land mammals find irresistible. Many hunters use it to bait their traps. Apis Drones will also follow their Queen into battle, so they can be used for self-defense in a pinch.
General: The entity that is the Giant Bee consists of the Queen Bee and the drone (called Giant Bee in game). Queen Bees and Drones appear when a wild beehive is damaged or destroyed.
Please remember the Single Player issue highlighted in the Notes section where the Hives can be empty once exiting the world.
Queen: The Giant Queen Bee is the center of the Giant Bee entity. It is the larger of the two that players will encounter. When it spawns into the world, it automatically becomes a hive. Wild Queens will spawn drones to protect itself while it flees from the destroyed hive and will keep spawning them after being tamed. Once tamed tribes players can interact with it like other pets but unlike othr creatures, it does not gain XP and cannot level up past the post taming additional levels. It has an inventory in which you ca place items and a food bar that does not drain very fast. From current tests, it can eat both ![]() Raw Meat and
Raw Meat and ![]() Rare Flowers, but seems to require hand feeding. The Queen will can continuously spawn drones that seemingly do not count towards the player and tribe's tame count. They do not show up as red in the kill feed if killed by the owning player or fellow tribe members.
Rare Flowers, but seems to require hand feeding. The Queen will can continuously spawn drones that seemingly do not count towards the player and tribe's tame count. They do not show up as red in the kill feed if killed by the owning player or fellow tribe members.
Drones: Drones are smaller of the two Giant Bees. They will spawn from inside a wild hive and swarm attackers. Once the Queen is tamed, they can be interacted with, with the exception of not having an inventory or a progression system. They will protect the player if their aggression is not set to Passive. They can also follow the player but only a certain distance before returning to the Queen. Giant Bee drones can be uploaded to Beacons and Obelisks and can be redownloaded. If they are downloaded, they will be severed from the Queen and can be used as guard dogs. However, they cannot be fed or leveled up and will despawn when the world is reloaded. Drones cannot be acquired from a tamed hive and are only produced by a tamed Queen. It will only produce a certain amount and the Drones seem to have lifespans. Sometimes they will live for 30 minutes or so and sometimes they will die 'en masse' within a few seconds of spawning.
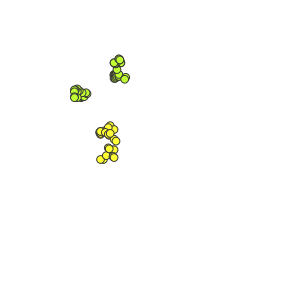
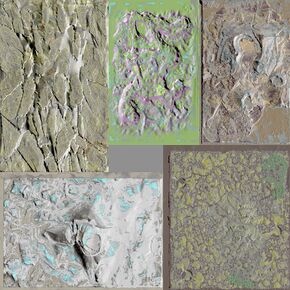
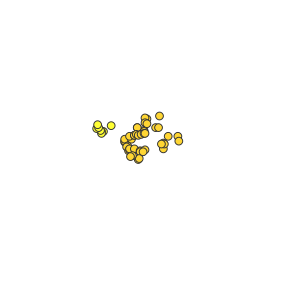
This section displays the Giant Bee's natural colors and regions. For demonstration, the regions below are colored red over an albino Giant Bee. The colored squares shown underneath each region's description are the colors that the Giant Bee will randomly spawn with to provide an overall range of its natural color scheme. Hover your cursor over a color to display its name and ID.
This information can be used to alter the Giant Bee's regions by entering cheat SetTargetDinoColor <ColorRegion> <ColorID> in the cheat console. For instance, cheat SetTargetDinoColor 0 6 would color the Giant Bee's "body highlights" magenta.


Region 1 is not used
for this Creature.

Region 3 is not used
for this Creature.
Region 4 is not used
for this Creature.

This section displays the Giant Bee's natural colors and regions. For demonstration, the regions below are colored red over an albino Giant Bee. The colored squares shown underneath each region's description are the colors that the Giant Bee will randomly spawn with to provide an overall range of its natural color scheme. Hover your cursor over a color to display its name and ID.
This information can be used to alter the Giant Bee's regions by entering cheat SetTargetDinoColor <ColorRegion> <ColorID> in the cheat console. For instance, cheat SetTargetDinoColor 0 6 would color the Giant Bee's "body highlights" magenta.

Region 1 is not used
for this Creature.

Region 3 is not used
for this Creature.
Region 4 is not used
for this Creature.

| Attribute | Base Value | Level Increase | Taming Bonus | ||
|---|---|---|---|---|---|
| Wild | Tamed | Additive | Multiplicative | ||
| 80 | +16 | +5.4% | 0.07 | ||
| 200 | +20 | +10% | |||
| 150 | +15 | +10% | |||
| 450 | +45 | +10% | |||
| 150 | +3 | +4% | |||
| 8 | +0.4 | +1.7% | 7% | 17.6% | |
| 100% | N/A | +1% | |||
| 400 | +24 | N/A | 0.5 | ||
| Attribute | Base Value | Level Increase |
|---|---|---|
| Wild | ||
| 200 | +40 | |
| 200 | +20 | |
| 150 | +15 | |
| 450 | +45 | |
| 150 | +3 | |
| 12 | +0.6 | |
| 100% | N/A | |
| 400 | +24 |
Type in values of a wild creature to see on which stats it's emphasized. Green values on a high-level creature are very good for breeding. If you have already tamed your creature you can try to recover the breeding stats with an external tool.[1]
The stat-calculator does not work in the mobile-view, see here for alternatives: Apps
Note that after the creature is tamed it gets bonuses on some stats depending on the taming effectiveness. This makes it hard to retrieve the levels on a tamed creature, so this tool is only for wild ones, but gives a first impression, how well the stats are distributed.
| Sting |
|
|---|
| Summon Bees |
|
|---|
Bee Hive
The Giant Queen Bee has an option on its wheel menu that converts it into a ![]() Bee Hive that works as structure, when it is placed it needs
Bee Hive that works as structure, when it is placed it needs ![]() Rare Flowers on its inventory to starts producing
Rare Flowers on its inventory to starts producing ![]() Giant Bee Honey on its inventory, it produces 1 of honey every 45 minutes and consumes 1 rare flower every 2 hours.
Giant Bee Honey on its inventory, it produces 1 of honey every 45 minutes and consumes 1 rare flower every 2 hours.
Minion Bees Consequences
In order to reduce the Minion Bees spam, a tamed Giant Queen Bee lose 3% of its total ![]() Health every time a minion die, also it cannot spawn minions if it is
Health every time a minion die, also it cannot spawn minions if it is ![]() Encumbered or if it is under 10% of its total health.
Encumbered or if it is under 10% of its total health.
This section describes how to fight against the Giant Bee.
These things are pure annoyances. You choose when to engage (by destroying a wild beehive), so you can prepare with ample time to do so. Just don't be stupid, don't walk into other creatures, and you should be fine.
Performing a barrel roll with a ![]() Pteranodon is a relatively safe way to destroy the hive without wasting too many resources such as bullets. If the barrel roll is aimed correctly, the Pteranodon can damage the hive with more damage than its regular attack and the barrel roll also allows the rider to move past the hive fast enough in order to not get stung by the Drones. Just repeat this strategy with you Pteranodons’s roll. Rocket Launchers are also great against wild hives. Another great way to destroy a hive is by using a
Pteranodon is a relatively safe way to destroy the hive without wasting too many resources such as bullets. If the barrel roll is aimed correctly, the Pteranodon can damage the hive with more damage than its regular attack and the barrel roll also allows the rider to move past the hive fast enough in order to not get stung by the Drones. Just repeat this strategy with you Pteranodons’s roll. Rocket Launchers are also great against wild hives. Another great way to destroy a hive is by using a ![]() Dire Bear as they have
Dire Bear as they have ![]() Bee Protection which makes you immune to bees.
Bee Protection which makes you immune to bees.
Ranged weapons and pikes or spears are effective against the drones.
Stings will dismount riders and slow players, making them easy targets for the swarm. Their small size makes them difficult to hit at times, they move at a fair pace, allowing them to chase any assailant attempting to raid the hive.
The drones are fairly slow and have low health, making them easy targets for ranged weapons. In addition they have limited time before dying off meaning as long as the survivor runs off a fair distance from the Queen, they'll be safe!
| Feeding Interval | Time | ||
|---|---|---|---|
| 1 | 00:00 | 0:00:28 | |
| 2 | 05:09 | 0:05:09 | |
| 4 | 03:25 | 0:10:17 | |
| 3 | 03:51 | 0:07:43 | |
| 3 | 05:47 | 0:11:35 | |
| 5 | 03:12 | 0:12:51 | |
| 6 | 01:32 | 0:07:43 | |
| 7 | 03:00 | 0:18:01 | |
| 11 | 01:27 | 0:14:32 | |
| 13 | 01:23 | 0:16:43 | |
| 16 | 01:22 | 0:20:35 | |
| 32 | 00:39 | 0:20:35 | |
| Feeding Interval | Time | ||
|---|---|---|---|
| 2 | 00:55 | 0:00:55 | |
| 3 | 03:51 | 0:07:43 | |
| 5 | 03:12 | 0:12:51 | |
| 3 | 03:51 | 0:07:43 | |
| 3 | 05:47 | 0:11:35 | |
| 6 | 03:05 | 0:15:25 | |
| 7 | 01:30 | 0:09:01 | |
| 9 | 02:53 | 0:23:09 | |
| 14 | 01:25 | 0:18:30 | |
| 17 | 01:22 | 0:21:52 | |
| 21 | 01:21 | 0:27:01 | |
| 42 | 00:39 | 0:27:01 | |
| Feeding Interval | Time | ||
|---|---|---|---|
| 2 | 00:55 | 0:00:55 | |
| 3 | 03:51 | 0:07:43 | |
| 6 | 03:05 | 0:15:25 | |
| 4 | 03:26 | 0:10:18 | |
| 4 | 05:08 | 0:15:26 | |
| 7 | 02:59 | 0:17:59 | |
| 9 | 01:26 | 0:11:35 | |
| 11 | 02:49 | 0:28:18 | |
| 18 | 01:23 | 0:23:47 | |
| 21 | 01:21 | 0:27:01 | |
| 27 | 01:20 | 0:34:43 | |
| 53 | 00:39 | 0:34:05 | |
| Feeding Interval | Time | ||
|---|---|---|---|
| 2 | 00:55 | 0:00:55 | |
| 4 | 03:26 | 0:10:18 | |
| 7 | 02:59 | 0:17:59 | |
| 5 | 03:13 | 0:12:52 | |
| 5 | 04:49 | 0:19:18 | |
| 9 | 02:53 | 0:23:08 | |
| 11 | 01:24 | 0:14:09 | |
| 13 | 02:47 | 0:33:26 | |
| 21 | 01:23 | 0:27:45 | |
| 26 | 01:20 | 0:33:26 | |
| 32 | 01:19 | 0:41:09 | |
| 63 | 00:39 | 0:40:31 | |
| Feeding Interval | Time | ||
|---|---|---|---|
| 2 | 00:55 | 0:00:55 | |
| 4 | 03:26 | 0:10:18 | |
| 8 | 02:56 | 0:20:33 | |
| 5 | 03:13 | 0:12:52 | |
| 5 | 04:49 | 0:19:18 | |
| 10 | 02:51 | 0:25:42 | |
| 13 | 01:23 | 0:16:43 | |
| 15 | 02:45 | 0:38:35 | |
| 25 | 01:22 | 0:33:02 | |
| 30 | 01:19 | 0:38:35 | |
| 37 | 01:19 | 0:47:35 | |
| 74 | 00:39 | 0:47:35 | |
| Feeding Interval | Time | ||
|---|---|---|---|
| 3 | 00:41 | 0:01:23 | |
| 5 | 03:13 | 0:12:52 | |
| 9 | 02:53 | 0:23:08 | |
| 6 | 03:05 | 0:15:26 | |
| 6 | 04:37 | 0:23:09 | |
| 12 | 02:48 | 0:30:50 | |
| 14 | 01:23 | 0:18:01 | |
| 17 | 02:43 | 0:43:43 | |
| 28 | 01:22 | 0:37:00 | |
| 34 | 01:19 | 0:43:43 | |
| 42 | 01:19 | 0:54:01 | |
| 84 | 00:39 | 0:54:01 | |
Note that the values are for optimal cases, always bring extra supplies!
For a level-dependent count of resources needed, try an external taming calculator.
Ingredients for ![]() Simple Kibble:
1 ×
Simple Kibble:
1 × ![]() Cooked Fish Meat, 1 ×
Cooked Fish Meat, 1 × ![]() Small Egg, 5 ×
Small Egg, 5 × ![]() Fiber, 5 ×
Fiber, 5 × ![]() Mejoberry, 2 ×
Mejoberry, 2 × ![]() Rockarrot, 1 ×
Rockarrot, 1 × ![]() Water
Water
Taming an Apis Queen is a difficult and annoying task, but with the proper knowledge, equipment, and creatures to aid you in the endeavor, it can become a relatively simple and easy effort.
The first step is preparation. Although possible to do without, it is a vastly easier effort with a ![]() Ghillie Suit, and
Ghillie Suit, and ![]() Bug Repellant and/or
Bug Repellant and/or ![]() Cactus Broth. In contrast you will almost always need
Cactus Broth. In contrast you will almost always need ![]() Grappling Hooks,
Grappling Hooks, ![]() Climbing Picks, or a
Climbing Picks, or a ![]() Sinomacrops, which will allow you to reach the hive if it is off the ground. All of these will help you to harvest bait for the trap without getting hurt and get close to the Queen without triggering aggression. Speaking of the trap, the best option available is a
Sinomacrops, which will allow you to reach the hive if it is off the ground. All of these will help you to harvest bait for the trap without getting hurt and get close to the Queen without triggering aggression. Speaking of the trap, the best option available is a ![]() Wooden Cage, as they are lightweight, portable, easily placed, and re-usable between taming attempts. You should only need one, as multiple cages, especially placed right next to one another, often complicate and confuse the Queen's wandering and her path to the bait. Lastly, the best option for breaking open the hive is a sturdy, strong, maneuverable tame who in most cases will need to be capable of flight.
Wooden Cage, as they are lightweight, portable, easily placed, and re-usable between taming attempts. You should only need one, as multiple cages, especially placed right next to one another, often complicate and confuse the Queen's wandering and her path to the bait. Lastly, the best option for breaking open the hive is a sturdy, strong, maneuverable tame who in most cases will need to be capable of flight. ![]() Tapejara,
Tapejara, ![]() Desmodus, and
Desmodus, and ![]() Rhyniognatha all make some of the best options, and are listed in ascending order of effectiveness. If the hive is on the ground, a
Rhyniognatha all make some of the best options, and are listed in ascending order of effectiveness. If the hive is on the ground, a ![]() Dire Bear makes an excellent option. Make sure every tame you bring is set to Passive.
Dire Bear makes an excellent option. Make sure every tame you bring is set to Passive.
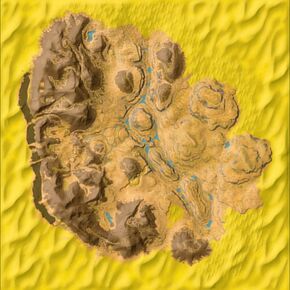
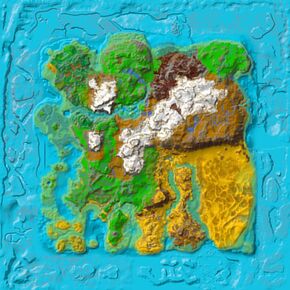
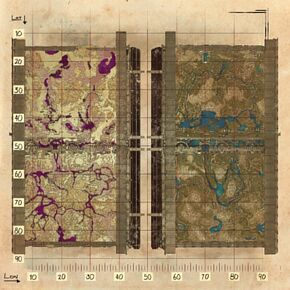
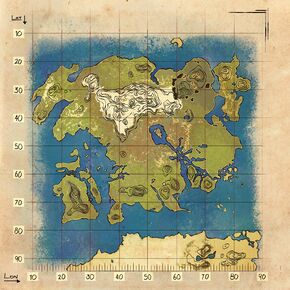
The second hurdle to cross is locating a wild hive, which depending on the map can be relatively easy or difficult. For most maps, Redwood forests are a safe bet, but not always so. Once found, you need to determine if the hive is occupied or not. All hives make a buzzing noise, but you will only hear the Queen's distinctive call from an occupied one, which she will make from time to time from inside, revealing her presence. When you've confirmed the hive is occupied, begin setting your trap; place the Wooden Cage you've brought with you a short distance away from the hive with the door facing it. Open the door in preparation and to confirm you have the opening facing the hive. Next you will need to clear out ALL wild creatures within a roughly 30-50 foundation radius. This will ensure no other creatures interfere with the trapping process. From here, you will need to collect the ONLY bait that will lead the Queen into your trap; ![]() Giant Bee Honey. Equip your Ghillie Suit and apply the Bug Repellent you brought to yourself, then make use of your chosen tool to reach the hive if it is off the ground. Climbing Picks are probably the least advised choice, as they are slow to ascend and descend, and angry drones will be chasing you the moment you harvest the honey. A Grappling Hook is the faster alternative, while a Sinomacrops is the easiest to use and can keep you safe from the drones by killing them with its scream when they appear. If the hive is on the ground, the Dire Bear is the best option for harvesting the bait. The more honey you have to use as bait, the better; finding another hive nearby to collect a second batch of bait is advised, to help correct potential mistakes made in placing the bait. Once you have your bait honey, apply every single one to a slot on your tool bar.
Giant Bee Honey. Equip your Ghillie Suit and apply the Bug Repellent you brought to yourself, then make use of your chosen tool to reach the hive if it is off the ground. Climbing Picks are probably the least advised choice, as they are slow to ascend and descend, and angry drones will be chasing you the moment you harvest the honey. A Grappling Hook is the faster alternative, while a Sinomacrops is the easiest to use and can keep you safe from the drones by killing them with its scream when they appear. If the hive is on the ground, the Dire Bear is the best option for harvesting the bait. The more honey you have to use as bait, the better; finding another hive nearby to collect a second batch of bait is advised, to help correct potential mistakes made in placing the bait. Once you have your bait honey, apply every single one to a slot on your tool bar.
With all the preparation finished, the third step is to break open the hive and trap the Queen. If you brought a Sinomacrops, make sure its Auto-Scream setting is disabled, as a single screech from your little helper can kill the Queen. It can still be kept on your shoulder however, as mounted shoulder-pets are not seen or regarded by wild creatures. Next, drop one of your bait honeys onto the ground (by using it from your tool bar) between the hive and the Wooden Cage, then mount your tame. Apply Bug Repellant to it (and yourself if your repellant has run out), then fly up to (or walk if it is a ground hive) to the side of the hive, so you are not in the way between the soon to be released Queen, the bait, and the trap. Next attack it once. If your tame's Melee Damage is not strong enough to break the hive in one hit, back away from the hive and kill off the drones that have emerged (be careful not to let your tame get stung, as this will force a dismount! Rhyniognatha and Sinomacrops are useful in case this happens, as you can stand on the former if dismounted, and the latter can save you from falls), and wait until the hive has calmed down (the drones stop spawning and have all died). If this happens, the drones might steal your initially placed bait during this, so if they do, replace it or protect it to ensure that they don't. Repeat until the hive is broken and the Queen is freed. Each hive has 5,000 health; you can use the Base Damage of your chosen tame to calculate how many levels in Melee Damage are required to destroy the hive in one hit, and a ![]() Training Dummy to test it out.
Training Dummy to test it out.
Once the Queen is out, immediately back away so that she and her drones do not turn aggressive to you or your hive-breaker, and quickly get your tame about a 15 foundation radius away from the trap radius. Dismount, always go into crouch mode (not prone), and get back to the trap area. By now, the Queen and her drones would have gone after the first bait you placed, ensuring they are near the Cage you set down. Maintain a 3-foundation distance and your crouch!, the Queen does not directly attack you, and her aggression is separate from her drones, but if she achieves 'aggressive' status against you, it can ruin the entire taming process, as she will refuse taming food, and will not lose aggression until you leave her render distance or find another means to break it (which unfortunately can cause her to de-spawn, though sometimes placing one more piece of honey out as bait after she is trapped can cause her to forget her aggression). Proceed to continue placing the Honey from your tool bar until the Queen is lured into your Cage, then quickly close the door! If the drones did not turn aggressive against you during this entire process, it is a very safe bet to say that the Queen is still neutral and willing to accept taming food.
Once caged, back away and equip your chosen taming food (listed above) on the final slot of your tool bar. Hold the crouch button to go prone, as this will allow you to get closer to the Queen and begin feeding her (ensure your Ghillie Suit is still fully equipped on all armor slots, and your Bug Repellent is still active, and that you do not get close enough to touch the Queen with your body, as this will trigger her aggression!). The same button to feed her (E, ![]() ,
, ![]() ) is also the same button used to open and close the Cage, so make sure the tool tip displayed is the one that says you are feeding the Queen, not opening the Cage! Sometimes, the Queen can be interacted with and fed through the Cage's bars, but this is not always so. Sometimes you will need to open the trap and crawl just a little inside to interact with her. Now this can accidentally set her free, but a safe way to do this, if you still have honey to use as bait, is to lay another one down outside of the Cage opposite side of the door. This will cause the Queen to fly into the Cage wall towards the placed bait, and allow you to open the door and quickly interact with her, then close it up again without releasing her from the trap. If you do this and she is still not interactable, it means she has aggression active and the process has been botched. Repeat until she has been tamed, all the while being very careful not to trigger her aggression and ruin the process! Once she has been tamed, you can press the use button (E,
) is also the same button used to open and close the Cage, so make sure the tool tip displayed is the one that says you are feeding the Queen, not opening the Cage! Sometimes, the Queen can be interacted with and fed through the Cage's bars, but this is not always so. Sometimes you will need to open the trap and crawl just a little inside to interact with her. Now this can accidentally set her free, but a safe way to do this, if you still have honey to use as bait, is to lay another one down outside of the Cage opposite side of the door. This will cause the Queen to fly into the Cage wall towards the placed bait, and allow you to open the door and quickly interact with her, then close it up again without releasing her from the trap. If you do this and she is still not interactable, it means she has aggression active and the process has been botched. Repeat until she has been tamed, all the while being very careful not to trigger her aggression and ruin the process! Once she has been tamed, you can press the use button (E, ![]() ,
, ![]() ) to collect her in your inventory as a place-able player-owned hive, which requires
) to collect her in your inventory as a place-able player-owned hive, which requires ![]() Rare Flowers to fuel honey production and maintain structure health.
Rare Flowers to fuel honey production and maintain structure health.
Having a tamed Queen in your menagerie of tames is without a doubt one of the best advantages you can have as, much like Farming, your newly acquired ![]() Bee Hive provides you with extremely beneficial, long-term results; a replenishing and easily accessed supply of
Bee Hive provides you with extremely beneficial, long-term results; a replenishing and easily accessed supply of ![]() Giant Bee Honey, which can be used in a wide variety of purposes. Unlike a wild hive, which will always be aggressive to you and will only yield up to 5 jars of Honey per harvest that only starts to replenish every 15 minutes; your tamed hive can hold up to 45 Honey, producing about 1 every 45 minutes. However, there is a catch; your tamed hive requires a supply of
Giant Bee Honey, which can be used in a wide variety of purposes. Unlike a wild hive, which will always be aggressive to you and will only yield up to 5 jars of Honey per harvest that only starts to replenish every 15 minutes; your tamed hive can hold up to 45 Honey, producing about 1 every 45 minutes. However, there is a catch; your tamed hive requires a supply of ![]() Rare Flower to produce Honey and will slowly begin to degrade in structure health and break without flowers in its inventory. Thankfully, the production cost is very low, as the Flowers are consumed one per hour and if the hive does break, your Queen will emerge from it; healthy and unharmed, able to be grabbed again to make a new hive that can be placed again when you are ready.
Rare Flower to produce Honey and will slowly begin to degrade in structure health and break without flowers in its inventory. Thankfully, the production cost is very low, as the Flowers are consumed one per hour and if the hive does break, your Queen will emerge from it; healthy and unharmed, able to be grabbed again to make a new hive that can be placed again when you are ready.
When tamed, there is a prompt displayed over the Queen Bee: "press E, ![]() ,
, ![]() to obtain hive". When doing so, a
to obtain hive". When doing so, a ![]() Bee Hive is placed in your inventory and the Queen disappears. The hive can then be placed like on the ground like a structure. When destroyed, the Queen that was used to build the
Bee Hive is placed in your inventory and the Queen disappears. The hive can then be placed like on the ground like a structure. When destroyed, the Queen that was used to build the ![]() Bee Hive will respawn and can then be used to create a new hive, which can be placed again when you have the Flowers to fuel it. Withdrawing Honey from your hive, however, can be a bit tricky, but nowhere near the effort that was required in order to tame your Queen in the first place. If you don't use the proper equipment when you access your hive's inventory, you will lose a small chunk of your health immediately and suffer the
Bee Hive will respawn and can then be used to create a new hive, which can be placed again when you have the Flowers to fuel it. Withdrawing Honey from your hive, however, can be a bit tricky, but nowhere near the effort that was required in order to tame your Queen in the first place. If you don't use the proper equipment when you access your hive's inventory, you will lose a small chunk of your health immediately and suffer the ![]() BEES! effect, which slows your movement speed by 1/3, drains 10% of your total health and then 15 damage evert 2 secibds over a 10 seconds. To avoid these hazards, you have a few options:
BEES! effect, which slows your movement speed by 1/3, drains 10% of your total health and then 15 damage evert 2 secibds over a 10 seconds. To avoid these hazards, you have a few options: ![]() Ghillie Armor,
Ghillie Armor, ![]() Tek Armor or
Tek Armor or ![]() Hazard Suit Armor: you only get the initial damage with the
Hazard Suit Armor: you only get the initial damage with the ![]() Ghillie Armor and
Ghillie Armor and ![]() Tek Armor, while the
Tek Armor, while the ![]() Hazard Suit Armor gets damaged instead. Finally, there is the option of
Hazard Suit Armor gets damaged instead. Finally, there is the option of ![]() Bug Repellant, which allows you to access the hive without any of the typical consequences.
Bug Repellant, which allows you to access the hive without any of the typical consequences.
cheat summontamed Bee_Queen_Character_BP_C| Patch | |
|---|---|
| 257.0 | |
| 257.4 | |
| 257.42 |
|
| 259.0 | Fixed issue where bee hives were stacking on top of each other. |
| 261.0 | Drone bees no longer give XP. |
| 262.0 | Accessing a Bee Hive no longer provides the player with |
| 276.42 | Fixed issue with Queen Bee. |
| 278.0 | |
| 305.12 | Fixed a bug in which the |
| 310.67 |
|
| 311.74 Crystal Isles Expansion Release | Added |
| 312.65 | Having |
| 324.16 | Fixed invisible bees. |
| 326.3 | Fixed a bug where wild bees would not spawn. |
| 329.27 | Added bees to Genesis: Part 2. |
| Patch | |
|---|---|
| 33.46 | Bosses can no longer be lured by |
| 34.49 | Fixed several issues caused by Giant Bee sting attacks |


