


cheat summon Bigfoot_Character_BP_Ccheat SpawnDino "Blueprint'/Game/PrimalEarth/Dinos/Bigfoot/Bigfoot_Character_BP.Bigfoot_Character_BP'" 500 0 0 35cheat summon Bigfoot_Character_BP_Aberrant_Ccheat SpawnDino "Blueprint'/Game/PrimalEarth/Dinos/Bigfoot/Bigfoot_Character_BP_Aberrant.Bigfoot_Character_BP_Aberrant'" 500 0 0 35cheat summon Bigfoot_Character_BP_Hunt_Ccheat SpawnDino "Blueprint'/Game/Genesis2/Missions/Hunt/Dinos/Bigfoot_Character_BP_Hunt.Bigfoot_Character_BP_Hunt'" 500 0 0 35cheat summon Bigfoot_Character_BP_STA_Ccheat SpawnDino "Blueprint'/Game/Genesis2/Missions/ModularMission/Gauntlet2/STA/Dinos/Bigfoot_Character_BP_STA.Bigfoot_Character_BP_STA'" 500 0 0 35cheat summon Bigfoot_Character_BP_ExpG_Pod_Ccheat SpawnDino "Blueprint'/Game/Genesis2/Missions/ModularMission/Mashup/ExperimentG/DinosAndStructures/Bigfoot_Character_BP_ExpG_Pod.Bigfoot_Character_BP_ExpG_Pod'" 500 0 0 35

|
ギガントピテクス(jy-gan-toe-pith-i-kus)は、ARK: Survival Evolvedの生物の一種です。
このセクションは、サバイバーであるヘレナ・ウォーカーが書いた調査書を、正確にコピーすることを目的としています。この文章とゲーム内の生物との間には若干の食い違いがあるかもしれません。

ギガントピテクスは、不思議な生物です。普段はおとなしいのですが、彼らの縄張りに別の動物が入り込んだ瞬間、その静かな巨人はすぐさま暴れる巨獣へと変貌します。近くを通る際は注意しましょう。 彼らにとって最高の一日とは、木からベリーをつまんでだらだらと過ごすことのようです。そして誰かに挑発されない限り、一日のほとんどを狭い範囲内で過ごします。
ベリーを採取するのに熟達しているのに加え、島の植物から繊維を集めるよう教育できます。彼らは一日中、ベリーを食べながら、トライブのために繊維を運んでくれるでしょう。 遊ぶのが大好きなギガントピテクスは、テイムされると肩に乗せた騎手を空中に放り投げて遊びます。当人は遊んでいるだけですが、機転の利く者は、この「遊び」が壁や崖を飛び超えるのに役立つことに気付くでしょう。
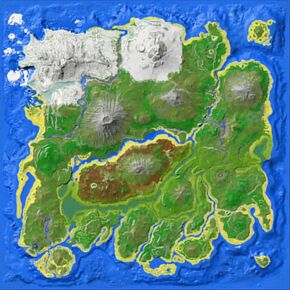
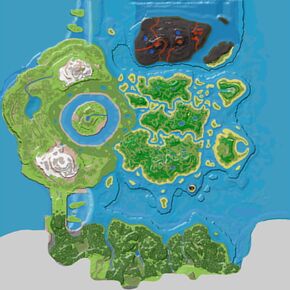
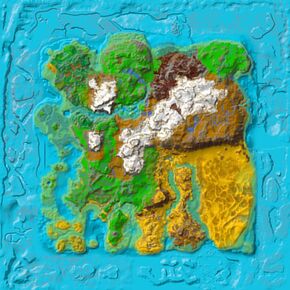
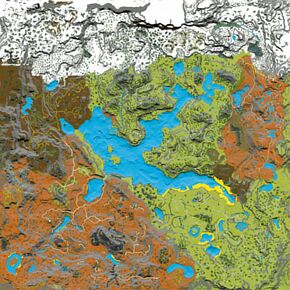
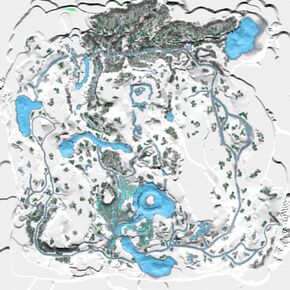
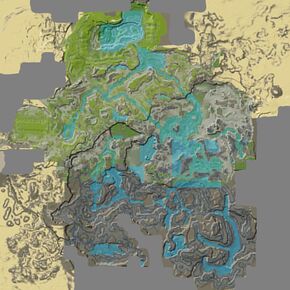
Gigantopithecus wander around the forests of the island, eating berries off of bushes. They are naturally peaceful creatures, but will fight back if attacked or if a player or tamed creature makes physical contact with them. Gigantopithecus normally spawn as individuals and are fairly spread out, so it is rare to see groups of them in the wild. While they mainly inhabit forests, they tend to wander quite far and can sometimes be found on beaches or near rivers and mountains.
With the introduction of the Snow Cave in Patch 237, a variant of Gigantopithecus spawns inside called the Yeti. They are untamable apes that only spawn inside the snow cave at levels up to 350. These apes are vicious, terrifying creatures that will decimate any adventurers hoping to step foot inside. Stay clear from them, or use extremely powerful guns and weaponry to slaughter them before they get their powerful hands on you!
The Gigantopithecus is a close relative of the modern orangutan. However, it stands upright like a man but slightly taller, giving it a strong resemblance to Bigfoot or the yeti.
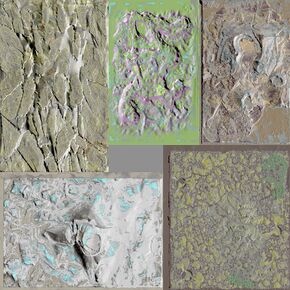
このセクションでは、ギガントピテクスの自然な色と領域が表示されます。デモンストレーションのために、以下の領域はアルビノのギガントピテクスの上に赤色で着色されています。各領域の説明の下に表示される色付きの四角形は、自然な配色の全体的な範囲を提供するためにギガントピテクスがランダムにスポーンする色です。色の上にカーソルを置くと、その色の名前とIDが表示されます。
この情報を使用して、チートコンソールにcheat SetTargetDinoColor <ColorRegion> <ColorID>と入力することにより、ギガントピテクスの領域を変更できます。たとえば、cheat SetTargetDinoColor 0 6はギガントピテクスの"fur mane"がmagenta色になります。


Region 1 is not used
for this Creature.
Region 2 is not used
for this Creature.
Region 3 is not used
for this Creature.


このセクションでは、ギガントピテクスの自然な色と領域が表示されます。デモンストレーションのために、以下の領域はアルビノのギガントピテクスの上に赤色で着色されています。各領域の説明の下に表示される色付きの四角形は、自然な配色の全体的な範囲を提供するためにギガントピテクスがランダムにスポーンする色です。色の上にカーソルを置くと、その色の名前とIDが表示されます。
この情報を使用して、チートコンソールにcheat SetTargetDinoColor <ColorRegion> <ColorID>と入力することにより、ギガントピテクスの領域を変更できます。たとえば、cheat SetTargetDinoColor 0 6はギガントピテクスの"fur mane"がmagenta色になります。
Region 1 is not used
for this Creature.
Region 2 is not used
for this Creature.
Region 3 is not used
for this Creature.
| 能力値 | 基準値 | レベルアップ | テイムボーナス | ||
|---|---|---|---|---|---|
| 野性生物 | テイム生物 | 追加 | 増加 | ||
| 640 | +64 | +5.4% | 0.07 | ||
| 300 | +30 | +10% | |||
| 150 | +15 | +10% | |||
| 1500 | +150 | +10% | |||
| 220 | +4.4 | +4% | |||
| 40 / 60 | +1.6 / +2.4 | +1.7% | 7% | 17.6% | |
| 100% | N/A | +1% | 6% | ||
| 1100 | +66 | N/A | 0.5 | ||
| 移動 [u/s] |
基本速度 | スプリント速度 | スタミナ | ||||
|---|---|---|---|---|---|---|---|
| 野生 | テイム1 | テイム2 | 野生 | テイム1 | テイム2 | ||
| 歩行 | 195 | ? | ? | 682.5 | 1023.75 | 1085.175 | 10 |
| 水泳 | 300 | ? | ? | ? | ? | ? | ? |
野生生物の値を入力すると、どのステータスが目立っているかがわかります。高レベルの生物の値が緑色であれば、繁殖には非常に適しています。すでに生物をテイムしている場合は、外部ツールを使って繁殖用のステータスを取り戻すことができます。[1]
stat-calculatorはモバイルビューでは機能しません。代替方法についてはこちらをご覧ください: Apps
生物がテイムされた後は、テイム効果に応じていくつかのステータスにボーナスを得ることに注意してください。このため、テイムされた生物のレベルを取得することは困難です。したがって、このツールは野生生物のみを対象としていますが、ステータスがどのように配分されているかという第一印象を与えることができます。
| 給餌間隔 | 時間 | ||
|---|---|---|---|
| 3 | 03:38 | 0:07:17 | |
| 18 | 01:55 | 0:32:49 | |
| 18 | 01:55 | 0:32:49 | |
| 18 | 01:55 | 0:32:49 | |
| 18 | 03:51 | 1:05:37 | |
| 24 | 01:25 | 0:32:49 | |
| 36 | 00:56 | 0:32:49 | |
| 給餌間隔 | 時間 | ||
|---|---|---|---|
| 4 | 03:14 | 0:09:43 | |
| 26 | 01:53 | 0:47:24 | |
| 26 | 01:53 | 0:47:24 | |
| 26 | 01:53 | 0:47:24 | |
| 26 | 03:47 | 1:34:47 | |
| 35 | 01:24 | 0:47:51 | |
| 52 | 00:55 | 0:47:24 | |
| 給餌間隔 | 時間 | ||
|---|---|---|---|
| 5 | 03:02 | 0:12:09 | |
| 35 | 01:52 | 1:03:48 | |
| 35 | 01:52 | 1:03:48 | |
| 35 | 01:52 | 1:03:48 | |
| 35 | 03:45 | 2:07:35 | |
| 46 | 01:23 | 1:02:53 | |
| 69 | 00:55 | 1:02:53 | |
| 給餌間隔 | 時間 | ||
|---|---|---|---|
| 6 | 02:54 | 0:14:34 | |
| 43 | 01:51 | 1:18:23 | |
| 43 | 01:51 | 1:18:23 | |
| 43 | 01:51 | 1:18:23 | |
| 43 | 03:43 | 2:36:45 | |
| 58 | 01:23 | 1:19:17 | |
| 86 | 00:55 | 1:18:23 | |
| Feeding Interval | Time | |||
|---|---|---|---|---|
| 3 | 05:28 | 0:10:56 | ||
| 27 | 01:25 | 0:36:55 | ||
| 41 | 00:56 | 0:37:22 | ||
| 1 | 00:00 | 0:03:39 | ||
| 9 | 01:32 | 0:12:19 | ||
| 14 | 00:58 | 0:12:46 | ||
| 1 | 00:00 | 0:03:39 | ||
| 1 | 00:00 | 0:01:23 | ||
| 2 | 01:50 | 0:01:50 | ||
| 1 | 00:00 | 0:03:39 | ||
| 1 | 00:00 | 0:01:23 | ||
| 1 | 00:00 | 0:00:55 | ||
| Feeding Interval | Time | |||
|---|---|---|---|---|
| 4 | 04:51 | 0:14:35 | ||
| 40 | 01:24 | 0:54:41 | ||
| 60 | 00:55 | 0:54:41 | ||
| 2 | 07:18 | 0:07:18 | ||
| 14 | 01:28 | 0:19:09 | ||
| 20 | 00:57 | 0:18:14 | ||
| 1 | 00:00 | 0:03:39 | ||
| 2 | 02:45 | 0:02:45 | ||
| 2 | 01:50 | 0:01:50 | ||
| 1 | 00:00 | 0:03:39 | ||
| 1 | 00:00 | 0:01:23 | ||
| 1 | 00:00 | 0:00:55 | ||
| Feeding Interval | Time | |||
|---|---|---|---|---|
| 6 | 04:22 | 0:21:52 | ||
| 60 | 01:23 | 1:22:01 | ||
| 89 | 00:55 | 1:21:07 | ||
| 2 | 07:18 | 0:07:18 | ||
| 20 | 01:26 | 0:27:21 | ||
| 30 | 00:56 | 0:27:21 | ||
| 1 | 00:00 | 0:03:39 | ||
| 2 | 02:45 | 0:02:45 | ||
| 3 | 01:22 | 0:02:45 | ||
| 1 | 00:00 | 0:03:39 | ||
| 1 | 00:00 | 0:01:23 | ||
| 1 | 00:00 | 0:00:55 | ||
| Feeding Interval | Time | |||
|---|---|---|---|---|
| 10 | 04:03 | 0:36:27 | ||
| 92 | 01:22 | 2:05:46 | ||
| 138 | 00:55 | 2:05:46 | ||
| 4 | 04:51 | 0:14:35 | ||
| 31 | 01:24 | 0:42:23 | ||
| 46 | 00:55 | 0:41:56 | ||
| 1 | 00:00 | 0:03:39 | ||
| 4 | 01:49 | 0:05:29 | ||
| 5 | 01:08 | 0:04:34 | ||
| 1 | 00:00 | 0:03:39 | ||
| 1 | 00:00 | 0:01:23 | ||
| 1 | 00:00 | 0:00:55 | ||
| Feeding Interval | Time | |||
|---|---|---|---|---|
| 16 | 03:53 | 0:58:19 | ||
| 157 | 01:22 | 3:34:37 | ||
| 235 | 00:54 | 3:34:09 | ||
| 6 | 04:22 | 0:21:52 | ||
| 53 | 01:23 | 1:12:27 | ||
| 79 | 00:55 | 1:12:00 | ||
| 1 | 00:00 | 0:03:39 | ||
| 6 | 01:38 | 0:08:13 | ||
| 8 | 01:02 | 0:07:18 | ||
| 1 | 00:00 | 0:03:39 | ||
| 1 | 00:00 | 0:01:23 | ||
| 1 | 00:00 | 0:00:55 | ||
| Feeding Interval | Time | |||
|---|---|---|---|---|
| 23 | 03:48 | 1:23:49 | ||
| 222 | 01:22 | 5:03:27 | ||
| 333 | 00:54 | 5:03:27 | ||
| 8 | 04:10 | 0:29:10 | ||
| 74 | 01:23 | 1:41:09 | ||
| 111 | 00:55 | 1:41:09 | ||
| 1 | 00:00 | 0:03:39 | ||
| 8 | 01:33 | 0:10:57 | ||
| 12 | 00:59 | 0:10:57 | ||
| 1 | 00:00 | 0:03:39 | ||
| 1 | 00:00 | 0:01:23 | ||
| 1 | 00:00 | 0:00:55 | ||
数値は最適な場合のものであり、常に予備を用意してください。
レベルに応じて必要な資源を計算するには、外部のTaming calculatorをご利用ください。
![]() キブル(通常)の材料:
1 ×
キブル(通常)の材料:
1 × ![]() 干し肉、1 ×
干し肉、1 × ![]() 中型の卵、5 ×
中型の卵、5 × ![]() 繊維、2 ×
繊維、2 × ![]() トウモロコシ、2 ×
トウモロコシ、2 × ![]() ジャガイモ、1 ×
ジャガイモ、1 × ![]() 水
水
Similar to the Ichthyosaurus, Gigantopithecus is tamed by hand-feeding rather than through the use of tranquilizers. To feed one you will need to be level 30, then place an appropriate food in the far-right slot of your hotbar and get close enough to the creature for the button prompt to appear. Gigantopithecus will take one piece of the food from your inventory and will play an eating animation. You must wait for the creature's hunger to go back down before it can be fed again, a process which takes some time, depending on the level and the food (see tables).
If you come into physical contact with Gigantopithecus while you are trying to feed it, the creature will attack. You must get out of its line of sight in order for it to calm back down and be feed-able again. Your taming progress will not be reset if the creature attacks you, but you will lose taming effectiveness if you fight back.
Be careful when approaching Gigantopithecus while feeding, as it will randomly change directions or stop, causing you to run into it. It is better to approach it from behind while it's standing still, since the creature usually doesn't turn all the way around while wandering. Or you can crouch up to it and feed it that way as it will not attack you when you're crouched.
It is best to bring a flying mount in case you need to run away, since they can easily be flown above the Gigantopithecus and it will give up the chase a lot quicker than on the ground. If a flying mount is not available, fast ground mounts such as a Raptor are decent alternatives.
Another method is to trap the Gigantopithecus in a 1x1 room with no roof or a hatchframe. You can then feed it from above without having to worry about bumping into it or having it wander off, and wild carnivores will have a tougher time getting to it.
The Gigantopithecus can also be trapped directly on spot so the camera has never to be moved during the process.
For this, it requires one foundation (Just even floor will not suffice), two fence foundations and five door frames. On the foundation, one fence foundations needs to be placed directly on the edge of it, and the second one should be snapped to the other one so it lays diagonally on the foundation. Now the foundation is separated in two triangles, and note that the triangles are of different sizes, and the bigger one will be the potential taming spot. Now it requires door frames on each but one side (So the Gigantopithecus can be lured into the box). After you have lured the Gigantopithecus into the box, close the last open side, and now it will walk around in the box (Aggressive or not), and you just have to keep one door frame projected at the diagonal fence foundation and place it as soon as possible. After it is placed, the Gigantopithecus barely has any possibility to move left.
When hand feeding him now, it is important to not stay on the foundation because then you have high risk of enraging it. It is advised to stay on the ground next to it and crouch, then it can be fed without any problems.
It is advised to use stone because it can easily become enraged by accident, but with enough care, wooden structures will also suffice (Thatch won't because it will be broken in the process of luring it in the box and losing aggro).
Since dropping it in the box with a flying mount is pretty hard and only possible with a Quetzal or Argentavis, it is much easier to lure it into it. For this, leave one side of the box open at first and place a doorframe on the opposite side. Then, after getting its attention, you just run into the box, wait until it is close enough to actually enter it, and then just leave through the door frame (It cant pass through it) and close the opposite side with a spare wall.
To lose its aggro, just travel vertically till the skybox is reached and instantly return. Horizontal travel to lose its interest is discouraged because it can cause the teleporting bug, which lets it exit the box (If this happens or not is dependent on the exact placement of the box), or may even let it despawn.
Sometimes, it may be still enraged and attacking the box when returning. In this case, you need to replace all wall/door structures it is attacking.
To tame the Gigantopithecus using the Quetzal method, it requires 2 people. The first person needs to carry the Gigantopithecus with the Quetzal, and hover close the ground. While it's been carried, the Gigantopithecus can be fed, and is less likely to retaliate against the tamer. If the feeder gets too close, it will still throw a punch, but it wont affect the tame or aggro it. The Quetzal might slide around over time, so the Quetzal rider only has to adjust its position every now and then. Along with feeding the Quetzal food/stimberries to keep it flying. Alternative, on PC, the player riding the Quetzal can hold X to prevent it from moving in the air, thus allowing it to keep the Gigantopithecus completely still.
When sitting on a Gigantopithecus and pressing the alt-fire button (default: right click), it will grab the survivor with the blue crosshair appearing in front of the HUD. It will toss him/her forward upon clicking again. This can be used to get over walls without destroying them. Be careful as this does cause the Gigantopithecus to melee attack directly in front of it, damaging anything or anyone in the established path.
If you have the Glider Suit, this can give you an excellent bit of elevation to glide around and get a good view. The Gigantopithicus can easily follow you when gliding, if you know what you're doing. As well, if you deploy the parachute, it will carry you forwards for an incredible distance, faster than most animals can run, the downside being you won't have your Gigantopithicus to defend you when you finally land.
They are an excellent mount for gaining an acrobatic advantage if you know what you're doing.Also fun fact when tamed the fiber gathering/pickup attack does torpor to enemies and wild dinos so it can be used to knock players out for an easy kill.
The Gigantopithecus is capable of carrying the following shoulder-mounts, in addition to a human rider:
Both ![]() Microraptor,
Microraptor, ![]() Dimorphodon and
Dimorphodon and ![]() Pegomastax will attack (or pickpocket, in Pegomastax's case) the opposing survivor if thrown towards them in PvP-enabled server.
Pegomastax will attack (or pickpocket, in Pegomastax's case) the opposing survivor if thrown towards them in PvP-enabled server.
![]() Ichthyornis will do the same thing as it does for survivors when thrown towards fish.
Ichthyornis will do the same thing as it does for survivors when thrown towards fish.
Can only pick ![]() Ferox when small. Also, when a small Ferox is carried, it will glitch and appear between the two Gigantopithecus' feet.
Ferox when small. Also, when a small Ferox is carried, it will glitch and appear between the two Gigantopithecus' feet.
The Gigantopithecus can only target tribe-owned creatures, and cannot be used to pick up wild or enemy variants.
| 資源 | 効率 |
|---|---|
| ★★★★★ | |
| ★★★★☆ | |
| ★★★☆☆ | |
| ★★☆☆☆ | |
| Fiber can be gathered when Gigantopithecus is wandering, and while ridden with C, | |
This section describes how to fight against the Gigantopithecus.
The Gigantopithecus has fairly good health and attack, since it is passive until you get too close it is easy to avoid if you don't think you can handle it.
Gigantopithecus has a good amount of knockback, this can be used to your advantage if you're using ranged weaponry and have fairly good armor or health. Keep walking backwards while attacking it with ranged attacks, and if it hits you use the knockback to give yourself more distance to keep attacking them.
Using a quetzal to pick up the gigantopithecus can be an effective way to easily kill it.
A Wild Gigantopithecus Is known to be passive, but if you bump into it as you try to feed it berries to Tame it, it will attack you so careful not to get too close when taming. If it agros you simply run away until it stops chasing, taming progress will not be lost. If you attack it, it will not stop chasing and tame is likely to be ruined. Given the added ability to tear through armor, it is best not to attempt taming with equipment that are expensive to repair.
Gigantopithecus' weakness is its strength. Gigantopithecus is known to knock you back on hit so if you survive you have a chance to run away. Once you are far enough the Gigantopithecus will ignore you and you can once again retry to tame it if so wish.
現実世界のギガントピテクスに関する情報については、関連するウィキペディアの記事を参照してください。
| Patch | 変更点 |
|---|---|
| 201.0 | |
| 201.1 |
|
| 201.2 |
|
| 201.4 | Gigantopithecus now properly gains |
| 202.0 | Survivor is now required to be level 40 or higher to tame a Gigantopithecus |
| 204.0 | Gigantopithecus can now manually harvest |
| 206.0 | Fixed where you could get instantly killed after dismounting from creatures like the Gigantopithecus |
| 223.0 | Added the creature "fur" pass to make hair and feathers look better |
| 237.0 | Added the |
| 259.0 | Added functionality to allow a player riding a Gigantopithecus to harvest |
| 278.0 TLC Phase 1 | Receives a model update, animation update, new fur and some new abilities:
|
| 278.1 |
Fixed issue where Gigantopithecus were not loading their stats values from previous savegames |
| 278.2 | Fixed an issue where the Aberrant Gigantopithecus couldn't be transfered off of Aberration |

Gigantopithecus with a rider before TLC #1.

Height and length of the throw before TLC #1.

Old version of dossier picture before TLC #1.

TLC Patch 1 model update.


