The Islandのオベリスクと供給品クレートからアクセスできるBroodmother Arena。
ブルードマザー
(ブルードマザー(アルファ)から転送)
ナビゲーションに移動
検索に移動
| このページには、ARK:Survival Evolvedの背景ストーリーに関連したネタバレが含まれている可能性があります。 あなたは物語のゲーム内を体験したい場合は、おそらくこのページの続きを読むべきではありません。 |
ブルードマザー

Lua エラー モジュール:Version/legacy 内、75 行目: unknown Switch version 599.0
スポーンコマンド
or
Variant Broodmother Lysrix (Gamma)
or
Variant Broodmother Lysrix (Beta)
or
Variant Broodmother Lysrix (Alpha)
or
Variant Broodmother Lysrix (Gamma) (The Center)
or
Variant Broodmother Lysrix (Beta) (The Center)
or
Variant Broodmother Lysrix (Alpha) (The Center)
or
Variant Broodmother Lysrix (Valguero)
or
Variant Broodmother Lysrix (Gauntlet)
or
cheat summon SpiderL_Character_BP_Cor
cheat SpawnDino "Blueprint'/Game/PrimalEarth/Dinos/Spider-Large/SpiderL_Character_BP.SpiderL_Character_BP'" 500 0 0 35Variant Broodmother Lysrix (Gamma)
cheat summon SpiderL_Character_BP_Easy_Cor
cheat SpawnDino "Blueprint'/Game/PrimalEarth/Dinos/Spider-Large/SpiderL_Character_BP_Easy.SpiderL_Character_BP_Easy'" 500 0 0 35Variant Broodmother Lysrix (Beta)
cheat summon SpiderL_Character_BP_Medium_Cor
cheat SpawnDino "Blueprint'/Game/PrimalEarth/Dinos/Spider-Large/SpiderL_Character_BP_Medium.SpiderL_Character_BP_Medium'" 500 0 0 35Variant Broodmother Lysrix (Alpha)
cheat summon SpiderL_Character_BP_Hard_Cor
cheat SpawnDino "Blueprint'/Game/PrimalEarth/Dinos/Spider-Large/SpiderL_Character_BP_Hard.SpiderL_Character_BP_Hard'" 500 0 0 35Variant Broodmother Lysrix (Gamma) (The Center)
cheat summon SpiderL_Character_BP_TheCenter_Cor
cheat SpawnDino "Blueprint'/Game/PrimalEarth/Dinos/Spider-Large/SpiderL_Character_BP_TheCenter.SpiderL_Character_BP_TheCenter'" 500 0 0 35Variant Broodmother Lysrix (Beta) (The Center)
cheat summon SpiderL_Character_BP_TheCenterMedium_Cor
cheat SpawnDino "Blueprint'/Game/PrimalEarth/Dinos/Spider-Large/SpiderL_Character_BP_TheCenterMedium.SpiderL_Character_BP_TheCenterMedium'" 500 0 0 35Variant Broodmother Lysrix (Alpha) (The Center)
cheat summon SpiderL_Character_BP_TheCenterHard_Cor
cheat SpawnDino "Blueprint'/Game/PrimalEarth/Dinos/Spider-Large/SpiderL_Character_BP_TheCenterHard.SpiderL_Character_BP_TheCenterHard'" 500 0 0 35Variant Broodmother Lysrix (Valguero)
cheat summon SpiderL_VAL_Character_BP_Cor
cheat SpawnDino "Blueprint'/Game/Mods/Valguero/Assets/Dinos/SpiderL/SpiderL_VAL_Character_BP.SpiderL_VAL_Character_BP'" 500 0 0 35Variant Broodmother Lysrix (Gauntlet)
cheat summon SpiderL_Character_BP_Gauntlet_Cor
cheat SpawnDino "Blueprint'/Game/Genesis/Dinos/MissionVariants/Gauntlet/Bog/SpiderL_Character_BP_Gauntlet.SpiderL_Character_BP_Gauntlet'" 500 0 0 35生息地
The Centerのオベリスクと供給品クレートからアクセスできるThe Center Arena。


テイム不可 洞窟
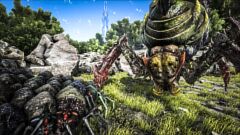
ブルードマザーは、ARK: Survival Evolvedのボスの1つです。The IslandとThe Centerの供給品クレートまたはオベリスクでポータルを生成することによってのみ到達できます。また、野生ではValgueroのThe Lairに生息しています。
Genesisのガントレットミッション「沼地の制裁」の最後のウェーブで、より弱いタイプのブルードマザーが出現します。(難易度アルファではXバージョンが出現します)
基本情報
外観
The Broodmother Lysrix is a giant Arachnid with a green body, two viciously large fangs seemingly dripping with venom with a mouth filled with razor sharp teeth behind the fangs and large spikes can be seen on the abdomen.
Colors of the Broodmother vary depending on the difficulty level.
配色と領域
ブルードマザーは常に同じ配色でスポーンし、カラー領域を持ちません。
これは、現在、ブルードマザーの色を変更することが不可能であることを意味します。
- Colors
The Broodmother has different types of color due to its difficulty level
| Broodmother Difficulty | Broodmother Color |
|---|---|
| Gamma (Easy) | Default Coloring |
| Beta (Medium) | Yellow |
| Alpha (Hard) | Red |
Known Information
Background

It is suggested in the Araneo dossier that the Broodmother is the queen and parent of the island's spiders.
Location
The Broodmother can be found in the Broodmother Arena and the The Center Arena. To reach this location, players must go to either a Supply Crate or Obelisk and place the required tribute items inside, then click on the ![]() Generate Broodmother Portal or the Center Portal item. At this point a portal will be opened to teleport nearby players and dinos into the arena, open for approximately 25 seconds. (Up to 10 survivors and 20 tames only.)
Generate Broodmother Portal or the Center Portal item. At this point a portal will be opened to teleport nearby players and dinos into the arena, open for approximately 25 seconds. (Up to 10 survivors and 20 tames only.)
Alternatively she can be found in the redwoods on Valguero.
If playing on The Island in Single Player mode, the portal can only be generated from the Green Obelisk.
必要な貢物
ブルードマザーポータルを開くには、次のものが必要です。
| 必要なアイテム | ガンマ | ベータ | アルファ |
|---|---|---|---|
| Player Level | 30 | 50 | 70 |
| 1 | 1 | 1 | |
| 1 | 1 | 1 | |
| 1 | 1 | 1 | |
| - | 5 | 10 | |
| - | 5 | 10 | |
| - | 5 | 10 | |
| - | 5 | 10 |
| 必要なアイテム | ガンマ | ベータ | アルファ |
|---|---|---|---|
| Player Level | 30 | 50 | 70 |
| 1 | 1 | 1 | |
| 1 | 1 | 1 | |
| 1 | 1 | 1 | |
| 1 | 1 | 1 | |
| - | 5 | 10 | |
| - | 5 | 10 | |
| - | 5 | 10 | |
| - | 5 | 10 |
貢物のスポーンコマンド
Use these commands to give yourself all the items needed for tribute:
| Gamma |
cheat giveitem "Blueprint'/Game/PrimalEarth/CoreBlueprints/Items/Artifacts/PrimalItemArtifact_05.PrimalItemArtifact_05'" 1 0 0 | cheat giveitem "Blueprint'/Game/PrimalEarth/CoreBlueprints/Items/Artifacts/PrimalItemArtifact_01.PrimalItemArtifact_01'" 1 0 0 | cheat giveitem "Blueprint'/Game/PrimalEarth/CoreBlueprints/Items/Artifacts/PrimalItemArtifact_03.PrimalItemArtifact_03'" 1 0 0
|
| Beta |
cheat giveitem "Blueprint'/Game/PrimalEarth/CoreBlueprints/Resources/PrimalItemResource_ApexDrop_Argentavis.PrimalItemResource_ApexDrop_Argentavis'" 5 0 0 | cheat giveitem "Blueprint'/Game/PrimalEarth/CoreBlueprints/Items/Artifacts/PrimalItemArtifact_05.PrimalItemArtifact_05'" 1 0 0 | cheat giveitem "Blueprint'/Game/PrimalEarth/CoreBlueprints/Items/Artifacts/PrimalItemArtifact_01.PrimalItemArtifact_01'" 1 0 0 | cheat giveitem "Blueprint'/Game/PrimalEarth/CoreBlueprints/Items/Artifacts/PrimalItemArtifact_03.PrimalItemArtifact_03'" 1 0 0 | cheat giveitem "Blueprint'/Game/PrimalEarth/CoreBlueprints/Resources/PrimalItemResource_ApexDrop_Sarco.PrimalItemResource_ApexDrop_Sarco'" 5 0 0 | cheat giveitem "Blueprint'/Game/PrimalEarth/CoreBlueprints/Resources/PrimalItemResource_ApexDrop_Sauro.PrimalItemResource_ApexDrop_Sauro'" 5 0 0 | cheat giveitem "Blueprint'/Game/PrimalEarth/CoreBlueprints/Resources/PrimalItemResource_ApexDrop_Boa.PrimalItemResource_ApexDrop_Boa'" 5 0 0
|
| Alpha |
cheat giveitem "Blueprint'/Game/PrimalEarth/CoreBlueprints/Resources/PrimalItemResource_ApexDrop_Argentavis.PrimalItemResource_ApexDrop_Argentavis'" 10 0 0 | cheat giveitem "Blueprint'/Game/PrimalEarth/CoreBlueprints/Items/Artifacts/PrimalItemArtifact_05.PrimalItemArtifact_05'" 1 0 0 | cheat giveitem "Blueprint'/Game/PrimalEarth/CoreBlueprints/Items/Artifacts/PrimalItemArtifact_01.PrimalItemArtifact_01'" 1 0 0 | cheat giveitem "Blueprint'/Game/PrimalEarth/CoreBlueprints/Items/Artifacts/PrimalItemArtifact_03.PrimalItemArtifact_03'" 1 0 0 | cheat giveitem "Blueprint'/Game/PrimalEarth/CoreBlueprints/Resources/PrimalItemResource_ApexDrop_Sarco.PrimalItemResource_ApexDrop_Sarco'" 10 0 0 | cheat giveitem "Blueprint'/Game/PrimalEarth/CoreBlueprints/Resources/PrimalItemResource_ApexDrop_Sauro.PrimalItemResource_ApexDrop_Sauro'" 10 0 0 | cheat giveitem "Blueprint'/Game/PrimalEarth/CoreBlueprints/Resources/PrimalItemResource_ApexDrop_Boa.PrimalItemResource_ApexDrop_Boa'" 10 0 0
|
ドロップ
- 採取
- 保証された特別な戦利品
- インベントリ
| アイテム | 難易度 | ||
|---|---|---|---|
| Gamma | Beta | Alpha | |
| 20 | 56 | 148 | |
Unlocks
- Tekgrams
 Mosasaur Tek Saddle
 Sloped Tek Roof
 Sloped Tek Wall Left
 Sloped Tek Wall Right
 Tek Boots
 Tek Catwalk
 Tek Ceiling
 Tek Fence Foundation
 Tek Foundation
 Tek Helmet
 Tek Ladder
 Tek Pillar
 Tek Railing
 Tek Ramp
 Tek Replicator
 Tek Staircase
 Tek Triangle Ceiling
 Tek Triangle Foundation
 Tek Triangle Roof
 Tek Turret
 Tek Wall
Completing the harder difficulties will unlock all of the lower difficulty Tekgrams as well.
- Achievements
 |
蜘蛛狩りの証/Veteran Survivor ARKの1体目の究極生命体を倒した! |
 |
センターの生き残り/Survivor of The Center The Centerのガーディアンを倒しました! |
基本ステータスと成長
| 能力値 | 基準値 | レベルアップ |
|---|---|---|
| 野性生物 | ||
| 324000 | +64800 | |
| 150 | +15 | |
| N/A | N/A | |
| 1500 | +150 | |
| 4000 | +80 | |
| 180 | +9 | |
| 100% | N/A | |
| 100000 | +6000 |
| 移動 [u/s] |
基本速度 | スプリント速度 |
|---|---|---|
| 野生 | 野生 | |
| 歩行 | 290
|
507.5 |
| 水泳 | 300
|
? |
- すべての生物のステータスの比較については、生物の基本ステータスを参照。
- レベルアップの計算が具体的にどのように行われるのかについては、生物の基本ステータスを参照。
- 1これらは100%の移動速度での生物の基本速度です。
- 2これらは生物をテイムし、刷り込みしない場合の速度です。
- すべての生物の速度の比較については生物の基本速度を参照。
| 能力値 | 基準値 | レベルアップ |
|---|---|---|
| 野性生物 | ||
| 648000 | +97200 | |
| 150 | +15 | |
| N/A | N/A | |
| 1500 | +150 | |
| 4000 | +80 | |
| 320 | +11.2 | |
| 100% | N/A | |
| 100000 | +6000 |
| 移動 [u/s] |
基本速度 | スプリント速度 |
|---|---|---|
| 野生 | 野生 | |
| 歩行 | 290
|
1091.125 |
| 水泳 | 300
|
? |
- すべての生物のステータスの比較については、生物の基本ステータスを参照。
- レベルアップの計算が具体的にどのように行われるのかについては、生物の基本ステータスを参照。
- 1これらは100%の移動速度での生物の基本速度です。
- 2これらは生物をテイムし、刷り込みしない場合の速度です。
- すべての生物の速度の比較については生物の基本速度を参照。
| 能力値 | 基準値 | レベルアップ |
|---|---|---|
| 野性生物 | ||
| 972000 | +243000 | |
| 150 | +15 | |
| N/A | N/A | |
| 1500 | +150 | |
| 4000 | +80 | |
| 540 | +40.5 | |
| 100% | N/A | |
| 100000 | +6000 |
| 移動 [u/s] |
基本速度 | スプリント速度 |
|---|---|---|
| 野生 | 野生 | |
| 歩行 | 290
|
1674.75 |
| 水泳 | 300
|
? |
- すべての生物のステータスの比較については、生物の基本ステータスを参照。
- レベルアップの計算が具体的にどのように行われるのかについては、生物の基本ステータスを参照。
- 1これらは100%の移動速度での生物の基本速度です。
- 2これらは生物をテイムし、刷り込みしない場合の速度です。
- すべての生物の速度の比較については生物の基本速度を参照。
| 能力値 | 基準値 | レベルアップ |
|---|---|---|
| 野性生物 | ||
| 356400 | +71280 | |
| 150 | +15 | |
| N/A | N/A | |
| 1500 | +150 | |
| 4000 | +80 | |
| 210 | +10.5 | |
| 100% | N/A | |
| 100000 | +6000 |
| 移動 [u/s] |
基本速度 | スプリント速度 |
|---|---|---|
| 野生 | 野生 | |
| 歩行 | 290
|
507.5 |
| 水泳 | 300
|
? |
- すべての生物のステータスの比較については、生物の基本ステータスを参照。
- レベルアップの計算が具体的にどのように行われるのかについては、生物の基本ステータスを参照。
- 1これらは100%の移動速度での生物の基本速度です。
- 2これらは生物をテイムし、刷り込みしない場合の速度です。
- すべての生物の速度の比較については生物の基本速度を参照。
| 能力値 | 基準値 | レベルアップ |
|---|---|---|
| 野性生物 | ||
| 421200 | +84240 | |
| 150 | +15 | |
| N/A | N/A | |
| 1500 | +150 | |
| 4000 | +80 | |
| 280 | +14 | |
| 100% | N/A | |
| 100000 | +6000 |
| 移動 [u/s] |
基本速度 | スプリント速度 |
|---|---|---|
| 野生 | 野生 | |
| 歩行 | 20
|
1015 |
| 水泳 | 300
|
? |
- すべての生物のステータスの比較については、生物の基本ステータスを参照。
- レベルアップの計算が具体的にどのように行われるのかについては、生物の基本ステータスを参照。
- 1これらは100%の移動速度での生物の基本速度です。
- 2これらは生物をテイムし、刷り込みしない場合の速度です。
- すべての生物の速度の比較については生物の基本速度を参照。
| 能力値 | 基準値 | レベルアップ |
|---|---|---|
| 野性生物 | ||
| 486000 | +97200 | |
| 150 | +15 | |
| N/A | N/A | |
| 1500 | +150 | |
| 4000 | +80 | |
| 700 | +35 | |
| 100% | N/A | |
| 100000 | +6000 |
| 移動 [u/s] |
基本速度 | スプリント速度 |
|---|---|---|
| 野生 | 野生 | |
| 歩行 | 290
|
2537.5 |
| 水泳 | 300
|
? |
- すべての生物のステータスの比較については、生物の基本ステータスを参照。
- レベルアップの計算が具体的にどのように行われるのかについては、生物の基本ステータスを参照。
- 1これらは100%の移動速度での生物の基本速度です。
- 2これらは生物をテイムし、刷り込みしない場合の速度です。
- すべての生物の速度の比較については生物の基本速度を参照。
野生生物のステータスのレベルアップ計算機
野生生物の値を入力すると、どのステータスが目立っているかがわかります。高レベルの生物の値が緑色であれば、繁殖には非常に適しています。すでに生物をテイムしている場合は、外部ツールを使って繁殖用のステータスを取り戻すことができます。[1]
Broodmother Lysrix (Gamma)
stat-calculatorはモバイルビューでは機能しません。代替方法についてはこちらをご覧ください: Apps
生物がテイムされた後は、テイム効果に応じていくつかのステータスにボーナスを得ることに注意してください。このため、テイムされた生物のレベルを取得することは困難です。したがって、このツールは野生生物のみを対象としていますが、ステータスがどのように配分されているかという第一印象を与えることができます。
戦闘
This section describes how to fight against the Broodmother Lysrix.
全般
The Broodmother is the intermediate of the Guardians on The Island being stronger than the ![]() Megapithecus but weaker than the
Megapithecus but weaker than the ![]() Dragon and while it does give you the least amount of rewards it's still best to fight the Broodmother after the Megapithecus and before the Dragon to help you better prepare for the Dragon fight.
Dragon and while it does give you the least amount of rewards it's still best to fight the Broodmother after the Megapithecus and before the Dragon to help you better prepare for the Dragon fight.
The Broodmother Lysrix is a dangerous enemy as It spawns ![]() Araneo as minions, slows players and mounts with its web attack, uses an acid projectile attack, and can cause torpor damage. However provided the right tames and equipment are brought to the battle, it can be defeated quite easily.
Araneo as minions, slows players and mounts with its web attack, uses an acid projectile attack, and can cause torpor damage. However provided the right tames and equipment are brought to the battle, it can be defeated quite easily.
戦略
There isn't really much strategy needed to fight a Broodmother, most of the time, whistling all dinos to attack her will be sufficient enough. Make sure before you do this, everyone is saddled up and on board their dinos. Success in this boss fight is largely dependent on the tames and saddles you bring. While they most likely wouldn't be used, firearms should be brought in as a last resort just to be safe.
おすすめのテイム生物
- A
 Yutyrannus or 2 (preferably mate boosted) should always be brought into any arena as it's one of if not the most valuable creature for Boss fights due to its courage roar ability and good stats making them a jack of all trades mount.
 - Using several
 Megatherium are probably the best fighting mounts you could bring to a Broodmother fight due to their increased damage to insects.
 - A couple of
 Spinosaurus could also be useful since there is water in the arena that they can get the hydrated buff from.
 - The Common strategy of
 Rex Rushing is almost always a good strategy for almost any boss due to their high health and damage.
 - If players are willing to put the effort into micromanaging their food the
 Daeodon can also be valuable due to their healing ability.
危険
- You can get caught off guard if you're not on a dino as the Broodmother has the ability to fire webs that slow anything down.
- Many of its attacks, both melee and ranged, can induce large amounts of
 Torpor. This can make the possibility of you, other players, and/or your creatures passing out, becoming useless and likely to die.
 - On top of that the Broodmother isn't the only creature in this fight that inflicts these special effects since the
 Araneo can use a web attack as well as inflict torpor damage just like the Broodmother.
 - On Alpha difficulty, Broodmother receives a significant buff to health and damage, requiring very high armor saddles, imprinting, and the Yutyrannus's courage buff. Make sure you have a strong breeding line of whichever dino you're bringing to the battle.
弱点
- There is quite a large variety of creatures you can use in this fight that can be effective.
- The Broodmother is quite slow.
- Megatheriums insect rage can quickly kill a Broodmother with little difficulty.
- Using a Procoptodon you can jump onto a mushroom in the arena and shoot the Broodmother with firearms solo without taking any damage (unless you're fighting the alpha variant).
備考/トリビア
- The Broodmother is the first Boss released for Ark. It could be spawned from any obelisk into the over world and fought. This was changed with v239.0, when it was given its respective arena that players had to teleport to.
- With the release of Valguero, it made the Broodmother the first open-world, naturally occurring boss.
- In the The Lair (Valguero) cocoons with spiders looking similar to the Broodmother can be found.
- Until patch 183.0 the Broodmother was actually tameable. However, this was removed from the game and in current versions; the Broodmother is not tameable with regular methods.
- After killing the Broodmother the first time, many players like to re-summon her in order to farm
 Chitin from the Spider Minions she summons (this was more common and easier prior to v239.0).
 - The Broodmother always spawns at level 1 in singleplayer.
- Her original dossier was actually written in Daedric writing from The Elder Scrolls series. It translates to a text that appears to be written in Latin, but in fact turns out to be the so-called "Lorem Ipsum", a common filler text used for publishing and graphics design.
- If forcetamed, the Broodmother can be ridden. The Broodmother has three attacks that can be used: the regular melee attack, webbing multi-shot, and toxic multi-shot.
- The Broodmother Lysrix rewards the player with less
 Element than the Megapithecus.
 - In the story, Helena mentions a tribe known as "The Iron Brotherhood" killed the Broodmother. It seems it was a hard-fought battle, since the Iron Brotherhood's leader lamented over the tribemates lost in the fight.
変更履歴
| Patch | 変更点 |
|---|---|
| 173.0 | Killing the Broodmother Lysrix will now update the dossier and Steam achievement correctly. |
| 184.0 | You can, ahem, no longer pick up the Broodmother with flyers |
| 213.1 | Can now summon Broodmother with tribute again |
| 239.0 | Added the Broodmother boss arena |
| 254.5 | Improved attack hit detection |
| 258.6 | Work in progress to rebalance the Broodmother fight |
| 258.71 | Rebalanced the Broodmother Lysrix and streamlined its arena |
| 259.0 | Colorized boss health to indicate boss difficulty |
| 261.0 |
|
| 262.0 |
|
| 316.18 | Element reward from The Island bosses & The Center has been increased by 100% |
スポットライト
ギャラリー
Official promo image for the Survival of the Fittest
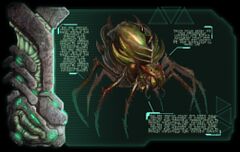
Original Dossier


参照資料
| 生物 |
|---|
|
カテゴリ:
- DynamicPageList3のdplvarパーサー関数を使用しているページ
- Tabberパーサータグを使用しているページ
- スクリプトエラーがあるページ
- Spoiler
- Requires dv value verification
- ボス
- 空想生物
- 無脊椎動物
- 攻撃的な生物
- テイムできない生物
- ブリーディングできない生物
- 気絶耐性のある生物
- 糞を落とさない生物
- 生物
- 未翻訳