The Caverns of Lost Hope
(Redirected from Caverns of Lost Hope)
Jump to navigation
Jump to search
The Caverns of Lost Hope

Interior Map

Location

The Caverns of Lost Hope is an underwater Cave on the east coast of The Island map. The cave contains the ![]() Artifact of the Cunning, needed to summon the
Artifact of the Cunning, needed to summon the ![]() Dragon. It is a challenging area of the map, especially for lower levels (40 and under).
Dragon. It is a challenging area of the map, especially for lower levels (40 and under).
Dangers
- Extremely cold temperatures.
- A vast portion of the cave is underwater.
- Extreme quantities of
 Mosasaurus,
  Plesiosaur,
  Tusoteuthis and other dangerous aquatic creatures.
 - Swarms of creatures boosted by
 Alpha Megalodon can cause your mount to get stuck and lose health quickly.
 - Surprisingly, the water within the cave is well lit and does not require a
 SCUBA Mask.
 - Creatures can spawn with very high levels.
- Be cautious when moving through the cave as creatures can be found hiding inside the walls.
Recommended Equipment
- A tamed Aquatic dinosaur (preferably a Basilosaurus)
Explorer Notes
- Rockwell Record #6: When approaching the Artifact, it is on the right Ruins walkway on the left corner closest to the Artifact spawn.
- Cnidaria Dossier: Passing the hole to the end of the cavern, you will go through a small, short cave and see some Ruins on the ground to the left. The Dossier is in the archway.
- Helena Note #9: Reach the end of the flooded cave and head deeper into the cave. You will see a hill in a right corner with stone stairs. The Note is past the stairs.
- Meiyin Note #9: Reach the end of the cave on land, the last note will be near some Ruins to the left, overlooking the first cave with air
Recommended creatures
- Tusoteuthis are able to brute force the cave with their long range and rapid attack speed. (Bring two opposite gendered creatures for the mate boost.)
 Basilosaurus are able to regenerate health after long endurance battles.(Bring two opposite gendered creatures for the mate boost, and park your basilos to heal near surfaces of air pockets.)
 Karkinos can avoid aggression from most threats in the cave, but be wary of
  Piranha.
 Ichthyosaurus and
  Mantas can speed through the cave with a skilled rider. (Difficult, requires practice.)
- Shadowmane can go invisible allowing you to navigate the cave unseen. (Works well with two people.)
- Exo-Mek is good choice since NOTHING will aggro
Tips/Notes
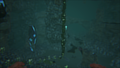
- The artifact lies fairly close to the entrance of the cave, at the end of a narrow tunnel that starts down behind an Obelisk-tech structure (see gallery below). The rest of the cave is rife with creatures to slay, but is not abundant in any particular resource nor can any of the creatures be tamed. At the end of the submerged caverns is what appears to be a standard cave filled with subterranean creatures and a couple Survivor Entries.
- The extremely high level
 Trilobite, and more importantly Piranha can be tamed with a fish basket. Piranha are also immune to all status effects, include the various stun/shock effects that render most creatures immobile, and the aggression inducing bile from
  Ammonite.
- The only loot crates found to date were in the submerged cavern, leaving the cave at the end undesirable to explore once the Explorer Notes have been collected.
- There are several ways to obtain the artifact, but two suggested methods are by using brute force, or by a high-speed bypass.
- Brute Force involves riding a high-level Mosasaurus/ Tusoteuthis or similar creature and just killing everything on the way in or out. This can be highly time-consuming and requires the appropriate dinosaur. Alternatively, bring a whole army of various high level creatures that are good underwater.
- High-speed bypass requires an Ichthyosaurus (simpler, and cheaper, to tame) or a Manta with high speed (suggested at least 150%, for best results); using their speed you simply race through the cave, ignoring as many enemies as possible on the way to the artifact. Be sure to put your mount on passive in case it gets attacked when you get off to get the artifact, but beware, as they will not last long alone. You may be forced to kite enemies away from the artifact before grabbing it, since these dinosaurs cannot reliably fight large groups. Be especially wary of
 Cnidaria and Tusoteuthis using this method, as they can quickly bring your speed run to a halt if you are knocked off your mount, or it is grabbed.
- Brute Force involves riding a high-level
- All loot crate positions can be found at the Explorer Map (The Island). All possible loot items are listed at Loot Tables/The Island/Caves.
Creatures
- Aquatic
 Alpha Megalodon
 Ammonite
 Angler
 Cnidaria
 Dunkleosteus
 Electrophorus
 Eurypterid
 Manta
Manta- Megalodon
 Mosasaur
 Piranha
 Plesiosaur
 Trilobite
 Tusoteuthis
- Subterranean
Compatible Tamed Creatures
This table is incomplete.
You can help us by adding the tamed creatures you know can enter the cave. If the creature can't enter, please exclude it.
Accessibility Ratings:
- Excellent: Full-Cave Access (Entrance-to-Artifact)
- Limited: Can Access Portions of the Cave Safely
- Not Recommended: Can Get Stuck/Unable to Leave Cave
| Creature | Accessibility | Rideable | Notes |
|---|---|---|---|
| Excellent | Yes |
| |
| Excellent | Yes |
| |
| Excellent | Yes |
| |
| Excellent | Yes |
| |
| Excellent | Yes |
| |
| Excellent | No | ||
| Excellent | Yes |
| |
| Excellent | Yes |
| |
| Excellent | No |
| |
| Excellent | No |
| |
| Excellent | Yes |
| |
| Excellent | No |
| |
| Excellent | Yes |
| |
| Excellent | Yes |
| |
| Excellent | Yes |
| |
| Excellent | Yes |
| |
| Excellent | Yes |
| |
| Excellent | No | ||
| Excellent | Yes |
| |
| Excellent | Yes |
| |
| Limited | Yes |
| |
| Excellent | No | ||
| Excellent | Yes |
| |
| Excellent | Yes |
| |
| Limited | Yes |
|
Resources
Sporadic ![]() Metal and
Metal and ![]() Obsidian nodes within the submerged tunnels, and rubble nodes within the cave.
Obsidian nodes within the submerged tunnels, and rubble nodes within the cave.
Gallery
Route to the Artifact
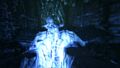
Artifact of the Cunning Crate
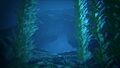
Entrance


Displayed are the locations for The Island. For locations found in DLCs, please see The Center, Scorched Earth, Ragnarok, Aberration, Extinction, Valguero, Genesis: Part 1, Crystal Isles, Genesis: Part 2, Lost Island, or Fjordur. | |
| Maps | |
| Plains | |
| Islands | |
| Mountains | |
| Beaches | |
| Forests | |
| Caves | |
| Arenas | |
| Other | Deep Ocean • Drayo's Cove • Ice Wyrm's Belly • The Belly of the Beast • The Deep Island • The Descent • The Frigid Deep • The Frozen Fang • The Frozen Maw • The Frozen Sea • The Gulch of Lamentation • The Hidden Lake • The Maw • The Shadow Road • The Throat of Borea • The Throat of Flame • The Writhing Swamps • Smuggler's Pass • Volcanic Maw |