Arenas de jefes
| Esta es una traducción en progreso. El contenido y el formato de esta página pueden variar durante las próximas horas o días. |
Las arenas de jefes (Boss Arenas en la versión original del juego) son una de las mecánicas del juego disponibles en ARK: Survival Evolved.
Progresión en la historia principal
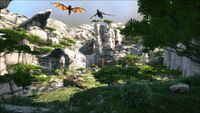
On The Island, there are four Arenas for fighting the game's Bosses: ![]() Broodmother Lysrix,
Broodmother Lysrix, ![]() Megapithecus,
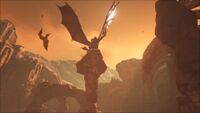
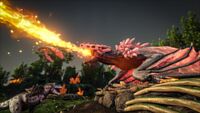
Megapithecus, ![]() Dragon, and finally the
Dragon, and finally the ![]() Overseer.
Overseer.
-
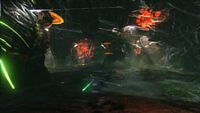 Broodmother Arena
 -
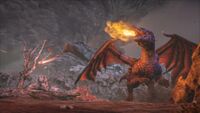 Dragon Arena
 -
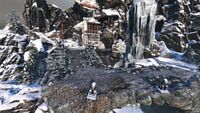 Megapithecus Arena
 -
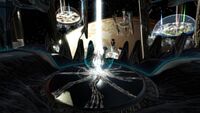 Overseer Arena
DLC Arenas
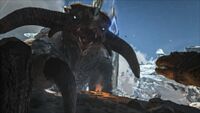
The Manticore Arena is featured in the DLC: Scorched Earth where survivors must defeat the ![]() Manticore.
Manticore.
The Center features an arena where both ![]() Broodmother and
Broodmother and ![]() Megapithecus must be defeated at the same time. Likewise, Ragnarok features an arena where both the
Megapithecus must be defeated at the same time. Likewise, Ragnarok features an arena where both the ![]() Manticore and the
Manticore and the ![]() Dragon must also be defeated together.
Dragon must also be defeated together.
The Forsaken Oasis is a boss arena featured in the DLC: Valguero where survivors must deal with ![]() Megapithecus,
Megapithecus, ![]() Manticore and
Manticore and ![]() Dragon. There is a separate arena of fighting against
Dragon. There is a separate arena of fighting against ![]() Broodmother as well.
Broodmother as well.
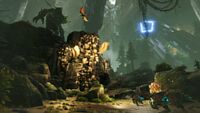
The Rockwell Arena is featured in the DLC: Aberration where survivors must defeat ![]() Rockwell.
Rockwell.
The King Titan Arena, Desert Titan Arena, Ice Titan Arena, and Forest Titan Arena are featured in the DLC: Extinction as part of the map rather than a separate section. All of the bosses (Titan) summoned are within the map, rather than being found in their own Arenas.
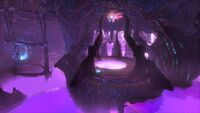
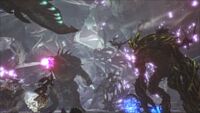
The VR is featured in DLC: Genesis where Corrupted Master Controller resides. Survivors must have cleared enough mission to trigger the fight through HLN-A.
-
 Manticore Arena
 -
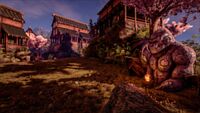 The Center Arena
 -
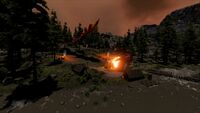 Ragnarok Arena
 -
 Rockwell Arena
 -
 Desert Titan Arena
 -
 Ice Titan Arena
 -
 Forest Titan Arena
 -
 King Titan Arena
 -
 Forsaken Oasis
 -
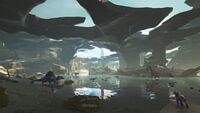
 Moeder Arena
 -
 System Root
 -
 Crystal Wyvern Queen Arena
Location
The Broodmother, Megapithecus, and Dragon Arenas are located under each of the three Obelisks. To reach these locations, players must go to either a Supply Crate or Obelisk and place the required tribute items inside, then click on the ![]() Generate Broodmother Portal,
Generate Broodmother Portal, ![]() Generate Megapithecus Portal, or
Generate Megapithecus Portal, or ![]() Generate Dragon Portal items. At this point a portal will be opened to teleport nearby players and dinos into the arena.
Generate Dragon Portal items. At this point a portal will be opened to teleport nearby players and dinos into the arena.
The Overseer Arena is accessible by completing the Tek Cave in the Volcano's caldera and teleporting to the Observation Deck.
- The Center Arena is featured in the DLC: The Center. It is accessed via a Beacon or Obelisk.
- The Ragnarok Arena is featured in the DLC: Ragnarok. It is accessed via a Beacon or Obelisk.
- The Forsaken Oasis is featured in the DLC: Valguero. It is accessed via a Beacon or Obelisk.
- The Manticore Arena is featured in the DLC: Scorched Earth. It is accessed via a Beacon or Obelisk.
- The Rockwell Arena is featured in the DLC: Aberration. It is accessed via a Beacon/Loot Crate or Obelisk, or found at his terminal located below Grave of the Lost.
- The King Titan Arena is featured in the DLC: Extinction. It is accessible near the Terminal itself, but does not function unless a King Titan is spawned. Likewise, the other bosses of Extinction do not possess an arena.
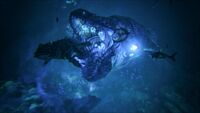
- The Moeder Arena is featured in the DLC: Genesis. It is acessible via a giant
 Mission Dispatcher
  found underneath the Ocean Biome.
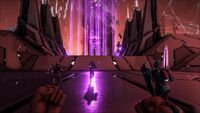
 - The System Root is featured in the DLC: Genesis. It is accessed via interacting with HLN-A.
Total Tribute
| Bosses | Gamma | Beta | Alpha |
|---|---|---|---|
| 10 | 50 | 70 | |
| 45 | 65 | 85 | |
| 55 | 75 | 100 | |
| 55 | 70 | 95 | |
| The Center's Guardians |
70 | 80 | 90 |
| Ragnarok's Guardians |
70 | 80 | 90 |
| Valguero's Guardians |
30 | 30 | 70 |
| 60 | 75 | 100 | |
| 1 | |||
| 1 | |||
| 1 | |||
| 1 | 1 | 1 | |
| 1 | 1 | 1 | |
| 1 | 1 | 1 | |
Tribute Requirements
These does not apply to Moeder Arena or System Root access. Table of Tributes
Rewards
Table of Tekgrams
Compatible Tamed Creatures
Criteria for entry:
- A maximum of 10 players and 10 creatures may enter at one time for a total of 20 combatants.
- Excluding the Scorched Earth map, player-ridden flyers can never enter.
- A creature's "drag weight" must be less than 560. This is how much the creature itself weighs, not its carrying weight seen in its inventory.
- To see this value in-game, place the creature on an
 Elevator Platform with an empty inventory and no saddle.
| Criatura | Accessible | Peso de criatura | Se puede montar | Notas |
|---|---|---|---|---|
| Sí | 50 | No | ||
| Sí | 285 | |||
| Sí | ||||
| Sí | 90 | |||
| Sí | ||||
| Sí/No | 150 | Sí |
| |
| Sí | 110 | |||
| Sí | 110 | |||
| No | 1000 | |||
| Sí | 250 | |||
| Sí | ||||
| Sí | 120 | |||
| Sí | ||||
| Sí | 20 | No | ||
| Sí | ||||
| Sí | 170 | No | ||
| Sí | 70 | No | ||
| Sí | 35 | Sí |
| |
| No | 575 | |||
| Sí | ||||
| Sí | ||||
| Sí | 25 | No | ||
| No | 1000 | No | ||
| Sí | 160 | |||
| Sí | ||||
| Sí | ||||
| No | ||||
| Sí | 150 | |||
| Sí | 25 | No | ||
| Sí | 35 | No | ||
| Sí | 410.23 | |||
| Sí/No | 149 | Sí |
| |
| Sí | ||||
| Sí | ||||
| Sí | 200 | |||
| Sí | 120 | |||
| Sí | ||||
| Sí | 25 | No | ||
| Sí | 300 | |||
| Sí | 95 | |||
| Sí/No | 35 | No |
| |
| Sí | 40 | No | ||
| Sí | ||||
| Sí | ||||
| No | ||||
| Sí | ||||
| Sí | 20 | No | ||
| Sí/No | 120 | Sí |
| |
| Sí | 120 | |||
| Sí | 410 | |||
| Sí/No | 149 | Sí |
| |
| Sí/No | 500 | Sí |
| |
| Sí | 85 | |||
| Sí | 550 | |||
| No | ||||
| Sí | ||||
| Sí | 200 | |||
| Sí | 110 | |||
| Sí | ||||
| Sí | ||||
| Sí/No | 149 | Sí |
| |
| Sí | ||||
| Sí | ||||
| Sí | ||||
| No | ||||
| Sí | 300 | |||
| Sí | 35 | No | ||
| Sí | ||||
| Sí | ||||
| Sí/No | 555 | Sí |
|
Notes
Entering / Leaving the Arena
Others
 Cryopod cannot be used in any parts of the boss arenas.
- PC version
To be teleported into the arena AND out of the arena, you MUST be dismounted.
- If you are mounted when you teleport into the arena, you teleport and dismount
- If you are mounted when you teleport out of the arena, you teleport and dismount
- Xbox version
- If you are mounted when you teleport into the arena, you teleport and dismount.
- If you are mounted when you teleport out of the arena, you don't die, but your dino gains a large amount of torpor.
Extinction and Genesis
Teleportation to the Titan summoned area or bosses in Genesis does not require you to dismount.
Equipment and Structure Restrictions
- No structures may be placed in the arenas. So avoid forming plans that revolve on building. If you attempt to place anything, the message "No ground or snap point available" will be displayed.
- Grappling hooks may be taken into the arena, but once equipped in a crossbow they cannot be fired. (May be related to why Thylacoleo does not teleport into arena.)
- Quetzal, while itself can be warped into Manticore Arena, may not warp inside if it is wearing a
 Platform saddle with at least one structure.
- All Tek gears and Tek saddles are banned from mainly the island Boss arena (Excluding Tek Cave/Overseer Arena) and Manticore Arena, and attempting to wear it inside when entering will either force unequip it, or drop at where the boss was summoned)
Item Losses
- You will lose summon items and dinos only upon running out of time or dying within the arena. Similarly, if no survivor are inside the arena when the portal is pulling dinos in, all the dinosaurs will die immediately. This excludes the arena at Extinction.
Multiples changes
- Due to the harsh consequences of a failed boss fight (see bullet point above), it is extremely advisable to prepare before attempting a boss fight. Watching online videos of other ARK players completing the Boss fight is a good way to elaborate your strategy in advance. However, there have been a lot of changes to the Boss Arenas during the development of the game, so ensure you are watching videos recorded after the last patch changing Boss Arenas. Also Singleplayer Bosses are weaker than Multiplayer Bosses, but never underestimate the Bosses.
Version History
| Versión | Lanzamiento | Cambios |
|---|---|---|
| 271.0 | 26 de septiembre de 2017 | * Fixed some boss exploits. (aka Dragon and Manticore barely land in the Arena) |
| 264.2 | 29 de julio de 2017 | * Fixed boss scaling for multiplayer sessions (approximately 67% easier) |
| 264.0 | 22 de julio de 2017 | * Final boss balance for Broodmother/Megapithecus/Dragon bosses in single-player. |
| 263.0 | 17 de julio de 2017 | * Fixed a case where the Gorilla Boss would float and walk backwards, unable to attack anything. * Additional damage and health adjustments to the Dragon, Megapithecus, and TheCenter bosses. |
| 262.0 | 14 de julio de 2017 | * Dragon boss no longer present on TheCenter. * Center Boss damage reduced by 33% versus TheIsland bosses. * Fixed Bosses so they no longer have random levels, but will scale correctly on game and server difficulty. |
| 258.71 | 10 de junio de 2017 | * Rebalanced Broodmother and streamlined Broodmother Arena. |
| 258.45 | 4 de junio de 2017 | * Fixed some Boss Arena collisions |
| 258.42 | 3 de junio de 2017 | * Fixed collisions on Gorilla and Dragon arenas |
| 258.2 | 31 de mayo de 2017 | * Fixed Gorilla Boss arena boundary |
| ||||||||||||||||||||||||||||||||
| ||||||||||||||||||||||||||||||||
Plantilla:Nav Ubicaciones (The Center) Plantilla:Nav Ubicaciones (Scorched Earth)
| |||||||||||||||||||||||||||||||||||
| ||||||||||||||||||||||||||
| |||||||||||||||||||||||||||||||||||
Plantilla:Nav Ubicaciones Genesis: Part 1
| |||||||||||||||||||||||||||||||||||
| ||||||||||||||||||||||||||||||||||||||||||||||||||||||||
- Traducción en progreso
- Mecánicas del juego
- Gameplay mechanics
- Ubicaciones
- Falta traducción: TH