Life's Labyrinth (Ragnarok)
| This article is about content exclusive to the DLC: Ragnarok |
47.7° Lat, 78.9° Lon
49.0° Lat, 79.4° Lon
48.9° Lat, 79.4° Lon
48.0° Lat, 78.6° Lon
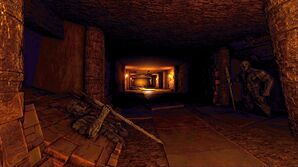
Life's Labyrinth is a dungeon in the desert. At the end of the dungeon in the Oasis you fight the ![]() Spirit Direbear and
Spirit Direbear and ![]() Spirit Direwolf bosses.
Spirit Direwolf bosses.
Overview
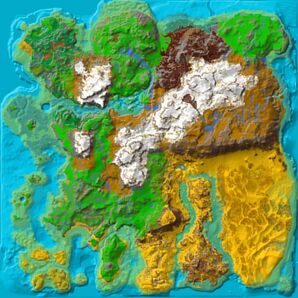
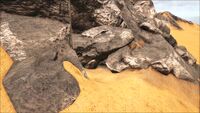
The entrance to the dungeon is found under a rock formation in the north of the desert, at the foot of the mountains. Specifically, the entrance is on the south-west side of the formation and can only fit a crouching human and very small dino, such as a ![]() Dodo
You will need supplies found throughout this page in order to survive the labyrinth, so make sure you read the article through before embarking on your journey, to make sure you make it all the way through!
Dodo
You will need supplies found throughout this page in order to survive the labyrinth, so make sure you read the article through before embarking on your journey, to make sure you make it all the way through!
Button Room
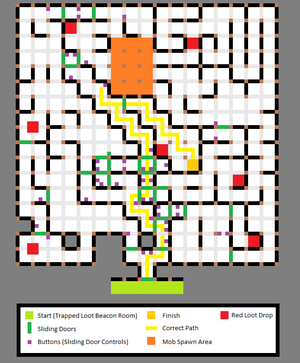
The entrance place has spikes popping up so be cautious of these. Once the player has entered, they are met with a maze-like room with buttons scattered around the walls. The buttons are allocated letters, some are duds and the others must be pressed in a certain order to proceed through the dungeon. The entrance to the next area is in the enclosed room directly opposite the entrance of the room (Next to the dud "L" button), take note of where it is as you will need to run there as the floor opens once the button is pressed and shuts after a certain amount of time.
The buttons need to be pressed in this order G R Á T A (GRÁTA - which mean crying, weeping in old scandinavian language). There are 3 button easily accessible: "G", "Á" and "T" however the other two need finding. The "R" button is over the wall to the north-east corner of the room, it is accessible by jumping along the edges, upon the two buttons placed diagonally on the wall. The final button "A" is in the little box up in the south-east corner, on the roof. To access this, the player will need to jump onto the "T" button off the pile of rubble next to it, making their way around the western edge of the room and jump up the walls that step up. Be careful as wrongly timed jump will knock the player down to the floor. The next goal is to get on the roof at the center of the room where from the player can sprint jump into the box with the "A" button.
- You can easily reach "A" with a durable
 Climbing Pick or a
  Tek Chestpiece with enough element to power the functionality.
Once pressed in order the floor opens a long shaft dropping down to the next area. As players drop into water at the bottom, no parachute is required here.
Fire Statue Room
Swim towards the corridor and make your way down it. You come to a dead end, however once you move close enough the door will open.
CAUTION do not run straight into the room. The large statue at the back of the room will spit fire at the player (Instant Kill to no armor players) if the wrong path through the room is taken. To not activate the fire, you need to crouch or prone, plus not touching any statue or uneven floor. It's ill-advised to let many players enter this room at once. If one make a mistake, the entire team is burnt. Pass this room one by one.
The two exits to this room are at the back of the room, either side of the statue and decide the path the player will take through the labyrinth. The room is full of buttons, the button that opens the right-hand door is immediately left on the rear wall as you enter the room. Alternatively, the button that opens the left-hand door is underneath the statue, protruding out of a pile of rubble.
If you decide to break through this section via armor and spamming Health Brew, it's advised to use immediate-repairable armors such as cloth or hide, or bring a spare of it, as the fire does 500 durability damage to armor pieces.
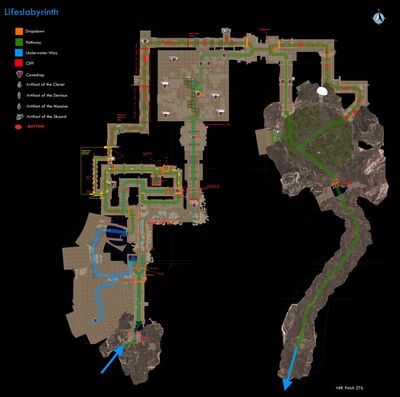
At this point, you will need to split your group or re-run the Dungeon later following the other way to obtain all artifacts of the dungeon.
Following the left side you will find the ![]() Artifact of the Skylord.
Artifact of the Skylord.
Following the right side you will find the ![]() Artifact of the Clever.
Artifact of the Clever.
Both of these lead in the end to the Sacrifice Room.
Right Door
Jumping Puzzle
A jumping puzzle is up next if the right door was chosen. In order to continue players must press the button on the right-hand side to raise the wall. Players need to jump their way through the puzzle. Be prepared to fall a lot and getting back to the beginning of the room by climbing a fallen column. As it is quite dark the use of any light source (e,g. ![]() Torch or Abberrant Shoulder Pet) is highly advised. Part way through, the platform just before the column wedged between the two walls is a pressure activated trap which releases gas around the player. You can either lie down and face the wall to get away from the gas or quickly jump onto the next platform (the column).
Torch or Abberrant Shoulder Pet) is highly advised. Part way through, the platform just before the column wedged between the two walls is a pressure activated trap which releases gas around the player. You can either lie down and face the wall to get away from the gas or quickly jump onto the next platform (the column).
- With an Archaeopteryx, a durable
 Climbing Pick or a
  Tek Chestpiece with enough element to power the functionality, you can skip this step
Bat Room
This room will be full of ![]() Onyc spawned by an invisible trigger. When you reach the stairs leading to the exit, the exit will shoot Spear Bolts, which hurt a lot. Stay by the sides to prevent triggering this trap. The right-hand button next to the exit opens the door.
Onyc spawned by an invisible trigger. When you reach the stairs leading to the exit, the exit will shoot Spear Bolts, which hurt a lot. Stay by the sides to prevent triggering this trap. The right-hand button next to the exit opens the door.
Loot Crate Room
The loot crate is trapped with arrows shooting at the player if they get too close but can be opened by slowly edging towards it. The button that opens the exit here is on the left-hand side BUT is the one closest to the exit, the other button next to it is a trap and releases a cluster of ![]() Grenades.
Grenades.
Maze
This section is a partly lit up maze full of opening doors via buttons. There are high level creatures (such as ![]() Titanoboa,
Titanoboa, ![]() Araneo &
Araneo & ![]() Arthropluera) in this section so weapons and torches are needed.
Arthropluera) in this section so weapons and torches are needed.
Once you've reached the finish, drop down into the hole (platforms provided) to reach a corridor. Follow it, taking care not to fall into the trench, until you reach the next area.
Left Door
Water tunnel
A long swim is before you!
Follow the path that is light.
Even as it is possible to swim through this part without a ![]() SCUBA Tank its recommended to use one, or bring Lazarus Chowder.
SCUBA Tank its recommended to use one, or bring Lazarus Chowder.
Circular maze
Traps are ahead of you - triggered by moving in place (invisible triggers) these traps will spawn
In addition to these traps there are hidden spikes in the floor that will immediately kill you, should you fall into those.
The exit is the door on the outer side where the narcotic trap is. To open the exit you need to find 2 doors and a button in the middle.
Press the button in the middle, on the right a small room full of spikes opens. Be quick because the door will close after a time and then not reopen, you will be stuck! Press the button on the right side of the torch, this opens the right door back out in the hallway. Now you need to be fast After you go through the right door, turn left and press the button under the torch. It opens the door further forward (usually a drop is there).
Run further till you find a drop (it is usually there) and 3 buttons on the left side. To make is easy press all 3 (left button opens a door to a room behind the left door, right button opens another door to the same room behind the left door, the middle button is a sequence to open the exit).
Run back where the 2 doors are to find that you opened a room that was behind the left door. You can see a button in the middle and 2 on the right press all 3. (middle button opens a door to go further back, the top right button opens to a red drop, bottom right is the second button in sequence to open the exit)
Now run to where the narcotic trap is, and on the right side is the exit.
Small tunnel
Shooting traps on the ceiling. To continue you need to open the door at the end of the tunnel, the button to open it is on the left side where you enter the tunnel (in-between the pillar and the wall). The exit will shut quickly so just run through it and don't look back. Additionally there is a button just before the exit opening a small room containing a loot crate, request you to press it and look back. If you run out the time and the exit shuts, just run back to the start point and press the button again.
Jumping pillars
Just jump to the end of this:
- If you have high movement speed try jumping backwards
- Try to work out the pattern of the spike coming out before you jump on it
- With an Archaeopteryx, a durable
 Climbing Pick or a
  Tek Chestpiece with enough element to power the functionality, you can skip this step
Sacrifice Room
The player needs to make a sacrifice to further progress
If you sacrifice a dino (shoulder pet or any other) the left door opens. Next up is a dark tunnel (a light source such as a ![]() Torch or Abberrant Shoulder Pet is recommeded as changing your Gamma settings won't work for this tunnel). Try not to step on any stone plates, which are pressure plates that summon Onyc.
Torch or Abberrant Shoulder Pet is recommeded as changing your Gamma settings won't work for this tunnel). Try not to step on any stone plates, which are pressure plates that summon Onyc.
If you sacrifice a human (player) the right door opens. Next up are closing, moving walls and 2 red drops in the middle. There will be a sign that warns you to walk slowly. This is a lie and in fact, you have to sprint through the tunnel before the walls collapse and trap you. Don’t forget to stop between the tunnels to pick up the red loot crates though.
Both ways lead to the Oasis.
Oasis (Main Artifact Room)
Which ever path was taken at the Fire Statue room ends up in this final room, an oasis full of ruins, ![]() Megaloceros and at the end are the
Megaloceros and at the end are the ![]() Artifact of the Devious and
Artifact of the Devious and ![]() Artifact of the Massive behind a barrier. To disable the barrier, the player must defeat the bosses of the dungeon, the
Artifact of the Massive behind a barrier. To disable the barrier, the player must defeat the bosses of the dungeon, the ![]() Spirit Dire Bear and the
Spirit Dire Bear and the ![]() Spirit Direwolf. If the spirits aren't present then attack the
Spirit Direwolf. If the spirits aren't present then attack the ![]() Megaloceros and they shall appear (in order to get any of them to spawn at all, either a player or tamed creature MUST be put into the sacrifice pit in the sacrifice room, but not to be killed, although there is no chance to save sacrificed creature without console commands(tested in v.291)). However, if the creature or player does survive, Tek Chestpiece and Climbing Pick may save them.
Megaloceros and they shall appear (in order to get any of them to spawn at all, either a player or tamed creature MUST be put into the sacrifice pit in the sacrifice room, but not to be killed, although there is no chance to save sacrificed creature without console commands(tested in v.291)). However, if the creature or player does survive, Tek Chestpiece and Climbing Pick may save them.
The ![]() Spirit Dire Bear and
Spirit Dire Bear and ![]() Spirit Direwolf will spawn in pairs and in waves, starting at level 50, and raising another 50 levels every wave, ending at level 250 (keep in mind that a level 250
Spirit Direwolf will spawn in pairs and in waves, starting at level 50, and raising another 50 levels every wave, ending at level 250 (keep in mind that a level 250 ![]() Spirit Dire Bear will hit hundreds of points of damage on lightly armored targets). Bolas, tranquilizers, and traps may be useful to keep them in place (although this has not yet been tested). In larger groups, shields may also be utilized to tank while other players attack with ranged weapons.
Spirit Dire Bear will hit hundreds of points of damage on lightly armored targets). Bolas, tranquilizers, and traps may be useful to keep them in place (although this has not yet been tested). In larger groups, shields may also be utilized to tank while other players attack with ranged weapons.
After killing the spirits a message will appear saying "The spirits have calmed", the border vanishes and the artifacts can now be achieved. The exit to this room and the Dungeon is now accessible via the larger water grate. The exit is once again blocked by a very low passage—crawling is necessary. Keep to the right to make it out before the ceiling crushes you.
Dangers
- Spike trap at the entrance
- Traps (including darts, fire)
- High level cave creatures
- Jumps (Namely, parkour jumps)
- Diving
Recommended Equipment
- a carryable dino (to sacrifice)
- (multiple)
 Parachute
  Climbing Pick
 Glider Suit
 Torch
Torch Medical Brew
 Lesser Antidote
 Metal Shield
 Flamethrower
 Water
Water SCUBA Tank or
  Lazarus Chowder
 Flak Armor
 Food
Food- Aberrant Shoulder Pet (for light)
- An Archaeopteryx, one is enough for all person to skip Jumping Puzzles
- Multiple People (you will need to split into two groups in order to get all artifacts, and you need a spare human if you plan on sacrificing a human)
Creatures
all creature in this dungeon spawn in higher levels and are untamable
 Arthropluera
 Dung Beetle
 Megaloceros
 Onyc
Onyc Pulmonoscorpius
 Spider
 Spirit Dire Bear
 Spirit Direwolf
 Titanoboa
Resources
There are no resource spawns in this dungeon.
Notes
- A shouldered
 Jerboa and/or vulture will be killed by the fire from the Fire Statue Room, so move with caution.
 - Wall-Climbing and Flying methods introduced before the release of Ragnarok, including Grappling Hook, cannot be used here.
- After being burned in the fire room and surviving, your skin gets a "crunchy/overdone" look (on Single Player, needs confirmation for official servers).
- Minor Bug: Dermis of Spirit Bear and Spirit Wolf both vanished from the Large Taxidermy Base after changing Servers (on Single Player, needs confirmation for official servers).

