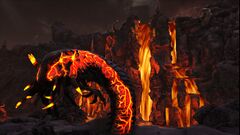
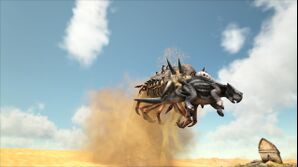
X-Deathworm in the Volcanic biome on Genesis: Part 1
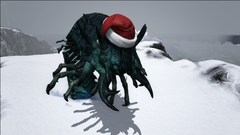
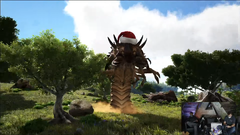
A Deathworm wearing the Iceworm Costume and the Santa Hat Skin
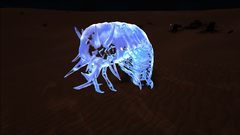
Deathworm Ghost
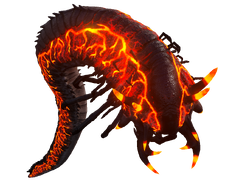
The X-Deathworm, textured by Eclipse
Deathworm wearing a hat in Wildcard's official 2021 Everlife stream
Deathworm
Jump to navigation
Jump to search


Deathworm

Spawn Command
or
or
or
or
or
or
or
cheat summon Deathworm_Character_BP_Tameable_Cor
cheat SpawnDino "Blueprint'/Game/Mods/NoUntameables/Deathworm/Deathworm_Character_BP_Tameable.Deathworm_Character_BP_Tameable'" 500 0 0 35Variant Aberrant Deathworm
cheat summon Deathworm_Character_BP_Aberrant_Tameable_Cor
cheat SpawnDino "Blueprint'/Game/Mods/NoUntameables/Deathworm/Deathworm_Character_BP_Aberrant_Tameable.Deathworm_Character_BP_Aberrant_Tameable'" 500 0 0 35Variant X-Deathworm
cheat summon Volcano_Deathworm_Character_BP_Tameable_Cor
cheat SpawnDino "Blueprint'/Game/Mods/NoUntameables/Deathworm/Volcano_Deathworm_Character_BP_Tameable.Volcano_Deathworm_Character_BP_Tameable'" 500 0 0 35Variant Alpha Deathworm
cheat summon MegaDeathworm_Character_BP_T_Cor
cheat SpawnDino "Blueprint'/Game/Mods/NoUntameables/Deathworm/MegaDeathworm_Character_BP_T.MegaDeathworm_Character_BP_T'" 500 0 0 35Variant Deathworm Ghost
cheat summon Ghost_Deathworm_Character_BP_Cor
cheat SpawnDino "Blueprint'/Game/Mods/NoUntameables/Deathworm/Ghost_Deathworm_Character_BP.Ghost_Deathworm_Character_BP'" 500 0 0 35Variant Iceworm
cheat summon Iceworm_Character_BP_T_Cor
cheat SpawnDino "Blueprint'/Game/Mods/NoUntameables/Deathworm/Iceworm_Character_BP_T.Iceworm_Character_BP_T'" 500 0 0 35Variant Corrupted Deathworm
cheat summon Deathworm_Character_BP_Corrupt_T_Cor
cheat SpawnDino "Blueprint'/Game/Mods/NoUntameables/Deathworm/Deathworm_Character_BP_Corrupt_T.Deathworm_Character_BP_Corrupt_T'" 500 0 0 353 Can be enabled via INI Config
The Deathworm's underground mechanics are rebuilt to be more similar to Basilisks and Reapers, eliminating the multitude of bugs with the vanilla version. They also now feature interactions with War Drums, and have a grabbing ambush attack.
Appearance
The normal variant is identical to vanilla. The Aberrant worm is smaller, being adapted to the narrower, rocky sands they inhabit on Aberration's Surface rather than wide-open dunes. They can additionally be found with deeper oranges than their normal counterpart, and occasional purples. The X-Deathworm is crackled with bright lava, and can be found in vibrant reds and oranges, with splashes of dark purples, blacks and lighter ash greys.
Color Scheme and Regions
This article is a work-in-progress.
The content and format of this page may change drastically over the next few hours or days.
Behavior
By default, wild Deathworms will remain still until a player or tame dino comes close enough for them to aggro, however this can be changed with a config to allow them to wander like most wild dinos. When close enough, they will burst from the ground and attempt to grab their prey, and if successful, will drag it underground and deal a large amount of damage. By default, Alpha Deathworms cannot grab anything, and wild Deathworms can't grab tame dinos, but both of these are also configurable.
War Drums
Wild Deathworms will aggro onto War Drums that are being actively played, though they will not switch their target to them if the worm is already aboveground attacking something. They are attracted from a much higher distance than their normal targeting range, and the most recently played War Drum has the highest priority. If a drum stops being played, they will lose interest in roughly 30 seconds, taking less time if the Deathworm is being attacked. They will otherwise ignore drums that are not actively being used. When tamed, and on PvP servers, Deathworms will also unbury if a non-allied player is playing war drums nearby. They will stare in the direction of the drums but not move unless aggroed. The range of detection is much lower than for wild Deathworms, and they will stay aboveground regardless of how the auto-bury toggle is set for 30 seconds.
Abilities
Deathworms possess a powerful ambush grab attack, which a rider can activate by using the C key while underground. Once the grab is activated, a cooldown buff of 5 minutes is added regardless of success and the attack cannot be used again until that time passes. This attack drags its unfortunate victim 'underground' (the creature is not truly underground, but is made to appear to be), and deals a large amount of damage, resulting in instant death for players in most cases and requiring incredibly high health and armour values to survive. Damage to dinos is determined by their drag weight. The Deathworm has both a minimum and maximum drag weight limit, and is able to grab anything up to 700 drag weight (Paracer or smaller, including flyers like Wyverns), and cannot grab anything below 80 drag weight, with the exception of survivors.
Certain creatures that live underground naturally- the ![]() Purlovia,
Purlovia, ![]() Nameless,
Nameless, ![]() Basilisk, and
Basilisk, and ![]() Reaper will fight back against the Deathworm, damaging it in the process and taking reduced damage. The amount of damage both taken and received is different for each species, and the
Reaper will fight back against the Deathworm, damaging it in the process and taking reduced damage. The amount of damage both taken and received is different for each species, and the ![]() Melee Damage stats of both the Deathworm and its held target are taken into account. For some creatures, the Deathworm will end up taking more damage, or even failing to deal any at all, so it's a good idea to avoid trying to grab them.
Melee Damage stats of both the Deathworm and its held target are taken into account. For some creatures, the Deathworm will end up taking more damage, or even failing to deal any at all, so it's a good idea to avoid trying to grab them.
Base Stats and Growth
Cloning
This article is a work-in-progress.
The content and format of this page may change drastically over the next few hours or days.
Combat
The Deathworm has high health and damage, and the ambush attack can be devastating if landed. If a survivor is grabbed, it is near-certain death, and if a mount is grabbed from beneath them, it can spell disaster if there are other creatures around which can swamp the survivor that is now on foot. The best defence against it is to listen for the rumble of the Deathworm approaching and being ready to move out of the way, or having another unmounted tame nearby as bait. Since the attack has a long cooldown, it can be baited into being used and dodging it, resulting in a few minutes of safety. Since the Deathworm can only use its grab when buried, staying in one place once it has unburied will prevent it from burying again and as a result, prevent the use of the grab. They are also slow, even more so in water, so they are easy to evade. Most mounts will be able to outpace them normally, but if extra distance is still required (particularly if boosting their speed with INI config), head for the nearest river.
Drops
Taming
For general information about domesticating a wild creature, see: Taming
Deaqthworms are tamed non-violently, rather than through the usual methods.
Deathworms are a passive tame bearing similarity to the ![]() Tusoteuthis. While they are fed passively, they require specific conditions to be fed first. In the Deathworm's case, they must be immobilised within a Deathworm Trap. The Deathworm Trap is a super-sized bear trap that will immobilize a Deathworm for around 30 seconds. The trap is only triggered when the worm unburies while inside of it, simply passing underneath will not trigger it. As a result, you must lure the Deathworm to unbury by standing right in front of or inside the trap. If tame dino grabbing is enabled and your mount is below their maximum grabbable drag weight, be careful to make sure it's approaching from an angle where it will pass through the trap, rather than flanking and grabbing your mount when it unburies. Once trapped, the Deathworm will fall over, allowing you to get close enough to its head to feed it. Their preferred food is Deathworm Horns, and they will eat 3 at a time. Like most passive tames, Deathworms will eat at 90% of their max food- Utilise the tame tracker UI to check their current food and avoid wasting traps. Deathworms do not lose taming progress or effectiveness when taking damage.
Tusoteuthis. While they are fed passively, they require specific conditions to be fed first. In the Deathworm's case, they must be immobilised within a Deathworm Trap. The Deathworm Trap is a super-sized bear trap that will immobilize a Deathworm for around 30 seconds. The trap is only triggered when the worm unburies while inside of it, simply passing underneath will not trigger it. As a result, you must lure the Deathworm to unbury by standing right in front of or inside the trap. If tame dino grabbing is enabled and your mount is below their maximum grabbable drag weight, be careful to make sure it's approaching from an angle where it will pass through the trap, rather than flanking and grabbing your mount when it unburies. Once trapped, the Deathworm will fall over, allowing you to get close enough to its head to feed it. Their preferred food is Deathworm Horns, and they will eat 3 at a time. Like most passive tames, Deathworms will eat at 90% of their max food- Utilise the tame tracker UI to check their current food and avoid wasting traps. Deathworms do not lose taming progress or effectiveness when taking damage.
Utility
Stealth Travel: Deathworms can be ridden while underground, and do not lose stamina while buried. Bringing a Scuba Tank will enable the worm and rider to be buried almost indefinitely. This can make them great choices for travelling in dangerous areas when you want to avoid combat, since they will not be targeted and cannot be damaged.
Ambush Combat Mount: If they are drawn into combat, their powerful ambush attack can heavily weaken or outright kill high priority enemies without putting the worm at risk, as long as the enemy creature is not naturally capable of burying. Their high stats in general also mean that they can deal heavy damage and last for a long time in sustained combat.
Transport: Their high weight can make them useful for hauling large amounts of heavy resources. The downside is their low speed means that while they can do so in safety, thanks to their stealth and general tankiness, it can take a long time to reach the destination if it is a long distance away.
Changelog
| Patch | Changes |
|---|
Notes/Trivia
- Scuba tanks or anything similar will prevent the player from suffocating while riding a Deathworm underground.
- Deathworms have costume forms for Iceworms (including particle effect changes to blue), and the Corrupted variant, which retains the original colors of the worm the costume is applied to. The Iceworm costume drops from wild Iceworms, both the Valguero and Ragnarok versions, and the Corrupted Deathworm costume drops from wild Alpha Deathworms.
- Deathworms do increased damage against War Drums, so in most cases they will be destroyed in one hit. The distraction is effective, but won't last long.
- War Drums are not edited by the mod. Vanilla drums will work along with any modded war drums that are a child class of the original, as well as those on the
 Mammoth. Drum targeting is done entirely through the Deathworm itself.
INI Configs
General configs affecting this creature, such as breeding and spawn colours, are not listed here. To view them, visit the full page of INI configs. All options must be placed under the [NoUntameables] header in GameUserSettings.ini. For general configuration information such as how to access the INI files, visit the Game Configuration page.
| Config | Description | |||
|---|---|---|---|---|
EnableWildDeathwormDinoGrab
|
Default value: FalseValue type: Boolean Allows wild Deathworms to grab tamed dinos | |||
DisableTamedDeathwormDinoGrab
|
Default value: FalseValue type: Boolean Prevents tamed Deathworms from being able to grab dinos | |||
DisableWildDeathwormPlayerGrab
|
Default value: FalseValue type: Boolean Prevents wild Deathworms from being able to grab players | |||
DisableTamedDeathwormPlayerGrab
|
Default value: FalseValue type: Boolean Prevents tamed Deathworms from being able to grab players | |||
EnableWildDeathwormRiddenDinoGrab
|
Default value: FalseValue type: Boolean Allows wild deathworms to grab tamed dinos that have riders | |||
DisableTamedDeathwormRiddenDinoGrab
|
Default value: FalseValue type: Boolean Prevents tamed deathworms from being able to grab tamed dinos that have riders | |||
EnableAlphaDeathwormGrab
|
Default value: FalseValue type: Boolean Allows Alpha Deathworms to use their grab attack. Respects the other wild Deathworm settings. | |||
DeathwormGrabWeightMinimum
|
Default value: 80.0Value type: Float Prevents Deathworms from picking up dinos below this drag weight | |||
DeathwormGrabWeightMaximum
|
Default value: 700.0Value type: Float Prevents Deathworms from picking up dinos above this drag weight | |||
DeathwormTargetingRange
|
Default value: 19400.0Value type: Float Natural targeting range of wild Deathworms. | |||
DeathwormAggroNeighborsRange
|
Default value: 3500.0Value type: Float Range at which nearby wild Deathworms are notified when one is aggro'd | |||
DeathwormTamedGrabWildOnly
|
Default value: FalseValue type: Boolean Tamed Deathworms can only grab wild dinos (not other players/tames). Automatically enabled on PvE, this is a recommended setting for "PvE" servers that use PvP settings. | |||
DeathwormAllowWandering
|
Default value: FalseValue type: Boolean Allows wild Deathworms to wander randomly | |||
DeathwormSpeedMultiplierWild
|
Default value: 1.0Value type: Float Speed multiplier for wild Deathworms. (Min 0.1, max 10.0) | |||
DeathwormSpeedMultiplierTamed
|
Default value: 1.0Value type: Float Speed multiplier for tamed Deathworms. (Min 0.1, max 10.0) |
Gallery


References
| Creatures | Alpha Reaper Queen • Ammonite • Attack Drone • Cnidaria • Deathworm • Defense Unit • Eurypterid • Glowbug • Jug Bug • Leedsichthys • Meganeura • Nameless • Reaper Queen • Seeker • Titanomyrma |
|---|---|
| Items | |