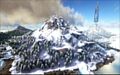
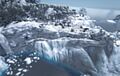
On The Island to the North/Northwest, one will find Whitesky Peak, Winter's Mouth, and their snow-covered slopes. The coast is lined with icebergs and Kairuku as well as treacherous cliffs.
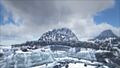
Whitesky Peak
Winter's Mouth
North West Cave Entrance
Snow

| Climate: | |
| Temperature: | |
| Precipitation: | Snow |
| Clothing: | |
| Release Date: | |
| 9月 28, 2015 (v216.0) | |
In order to survive, the player must make several risky moves if they wish to establish a prominent hold within the snow biome. Due to the freezing temperatures, the environment can turn into more of a problem than the creatures. A good remedy to this problem is ![]() Fur Armor, but this is crafted using
Fur Armor, but this is crafted using ![]() Pelt, which is obtained from the animals living within the snow biome itself. Thus, the player will need to launch several "sting operations" into the biome in order to extract pelt. This can be aided by using a dinosaur that can carry animals like an
Pelt, which is obtained from the animals living within the snow biome itself. Thus, the player will need to launch several "sting operations" into the biome in order to extract pelt. This can be aided by using a dinosaur that can carry animals like an ![]() Argentavis. By grabbing the animals and bringing them back to safely kill them elsewhere, one can amass pelt safely, albeit slowly. A good tip for beginners is the fact that the
Argentavis. By grabbing the animals and bringing them back to safely kill them elsewhere, one can amass pelt safely, albeit slowly. A good tip for beginners is the fact that the ![]() Sabertooth does not drop pelt. All players, however, must note that the use of the Fur Armor is rendered useless if it becomes wet, but it will instantly dry outside of water.
Sabertooth does not drop pelt. All players, however, must note that the use of the Fur Armor is rendered useless if it becomes wet, but it will instantly dry outside of water.
One must also note the animals that live in the snow biome can pose dangers and opportunities. ![]() Sabertooth and
Sabertooth and ![]() Direwolves prowl the area constantly, keeping the snowy landscape on constant watch. In addition, the Daeodon clusters prove just as troublesome, but the latter can heal itself in combat. The only prominent dinosaur here is the
Direwolves prowl the area constantly, keeping the snowy landscape on constant watch. In addition, the Daeodon clusters prove just as troublesome, but the latter can heal itself in combat. The only prominent dinosaur here is the ![]() Rex, which can keep players on lock-down for a long period of time, so confrontation is best left avoided. The Rexes here hunt actively and suffer no consequences from the cold, which means they are just as dangerous as the ones on the main island. They are best given a wide berth. Keep in mind that
Rex, which can keep players on lock-down for a long period of time, so confrontation is best left avoided. The Rexes here hunt actively and suffer no consequences from the cold, which means they are just as dangerous as the ones on the main island. They are best given a wide berth. Keep in mind that ![]() Giganotosaurus can spawn high on the mountains. Such a creature can devastate any intruders in an extremely quick motion. Unfortunately, nothing can save a player from being pounced upon by a Purlovia, unless they manage to spot the mound in the ground before they are knocked off their mount and paralyzed.
Giganotosaurus can spawn high on the mountains. Such a creature can devastate any intruders in an extremely quick motion. Unfortunately, nothing can save a player from being pounced upon by a Purlovia, unless they manage to spot the mound in the ground before they are knocked off their mount and paralyzed.
If the creatures on the ground haven't provided enough danger for the player, the air is home to ![]() Argentavis by the masses, and they will swoop down to attack unsuspecting players. The ones that spawn here tend to be higher level as well, which proves challenging when facing a swarm. Despite the dangers, the snow biome can be very beneficial.
Argentavis by the masses, and they will swoop down to attack unsuspecting players. The ones that spawn here tend to be higher level as well, which proves challenging when facing a swarm. Despite the dangers, the snow biome can be very beneficial. ![]() Mammoths roam in herds within the forest, and taming one secures a lasting source of
Mammoths roam in herds within the forest, and taming one secures a lasting source of ![]() Wood.
Wood. ![]() Kairuku drop
Kairuku drop ![]() Organic Polymer, which is one form of
Organic Polymer, which is one form of ![]() Polymer that can be used to make
Polymer that can be used to make ![]() Ghillie and
Ghillie and ![]() SCUBA Armor sets.
SCUBA Armor sets.
If a player considers the pros and cons of the region, they can plan ahead and become very successful within the snow biome.
On The Island to the North/Northwest, one will find Whitesky Peak, Winter's Mouth, and their snow-covered slopes. The coast is lined with icebergs and Kairuku as well as treacherous cliffs.

Whitesky Peak

Winter's Mouth

North West Cave Entrance
Snow

Murdersnow

Murder Murder Snow
.jpg)
Hibbert's Summit
-1.jpg)
Blizzard Peak
.jpg)
JackKnife Glacier
.jpg)
Kamaka Ice Lake
.jpg)
Cold Eye Ridge
.jpg)
Oscari Pass
Little Snow Top
.jpg)
SnowCherub Lake
Snow Forest
Snow Peak
Lava [[File:{{{image}}}|200px|left]]
| DLC: | |
| Climate: | |
| Temperature: | ??? |
| Precipitation: | ??? |
Cave [[File:{{{image}}}|200px|left]]
| Climate: | |
| Temperature: | ??? |
| Precipitation: | ??? |
Mountain [[File:{{{image}}}|200px|left]]
| Climate: | |
| Temperature: | ??? |
| Precipitation: | ??? |
Swamp [[File:{{{image}}}|200px|left]]
| Climate: | |
| Temperature: | ??? |
| Precipitation: | ??? |
Redwood Forest [[File:{{{image}}}|200px|left]]
| Climate: | |
| Temperature: | ??? |
| Precipitation: | ??? |
Jungle [[File:{{{image}}}|200px|left]]
| Climate: | |
| Temperature: | ??? |
| Precipitation: | ??? |
Grassland [[File:{{{image}}}|200px|left]]
| Climate: | |
| Temperature: | ??? |
| Precipitation: | ??? |
River [[File:{{{image}}}|200px|left]]
| Climate: | |
| Temperature: | ??? |
| Precipitation: | ??? |
Beach [[File:{{{image}}}|200px|left]]
| Climate: | |
| Temperature: | ??? |
| Precipitation: | ??? |
Ocean [[File:{{{image}}}|200px|left]]
| Climate: | |
| Temperature: | ??? |
| Precipitation: | ??? |
Badlands [[File:{{{image}}}|200px|left]]
| DLC: | |
| Climate: | |
| Temperature: | ??? |
| Precipitation: | ??? |
Dunes [[File:{{{image}}}|200px|left]]
| DLC: | |
| Climate: | |
| Temperature: | ??? |
| Precipitation: | ??? |
Wyvern Trench [[File:{{{image}}}|200px|left]]
| DLC: | |
| Climate: | |
| Temperature: | ??? |
| Precipitation: | ??? |
Fertile Chamber [[File:{{{image}}}|200px|left]]
| DLC: | |
| Climate: | |
| Temperature: | ??? |
| Precipitation: | ??? |
Bio-Luminescent Chamber [[File:{{{image}}}|200px|left]]
| DLC: | |
| Climate: | |
| Temperature: | ??? |
| Precipitation: | ??? |
Molten Element Chamber [[File:{{{image}}}|200px|left]]
| DLC: | |
| Climate: | |
| Temperature: | ??? |
| Precipitation: | ??? |
The Surface [[File:{{{image}}}|200px|left]]
| DLC: | |
| Climate: | |
| Temperature: | ??? |
| Precipitation: | ??? |
Sanctuary [[File:{{{image}}}|200px|left]]
| DLC: | |
| Climate: | |
| Temperature: | ??? |
| Precipitation: | ??? |
Wasteland [[File:{{{image}}}|200px|left]]
| DLC: | |
| Climate: | |
| Temperature: | ??? |
| Precipitation: | ??? |
Sulfur Field [[File:{{{image}}}|200px|left]]
| DLC: | |
| Climate: | |
| Temperature: | ??? |
| Precipitation: | ??? |
Forbidden Zone [[File:{{{image}}}|200px|left]]
| DLC: | |
| Climate: | |
| Temperature: | ??? |
| Precipitation: | ??? |
Desert Dome [[File:{{{image}}}|200px|left]]
| DLC: | |
| Climate: | |
| Temperature: | ??? |
| Precipitation: | ??? |
Snow Dome [[File:{{{image}}}|200px|left]]
| DLC: | |
| Climate: | |
| Temperature: | ??? |
| Precipitation: | ??? |
Sunken Forest [[File:{{{image}}}|200px|left]]
| DLC: | |
| Climate: | |
| Temperature: | ??? |
| Precipitation: | ??? |
これはドキュメントページで、メインテンプレートページに組み込まれる必要があります。詳しくはTemplate:Docをご覧ください。
.jpg)
.jpg)
